How to set up an NFS server and share files on Linux
With the help of NFS we can share a filesystem via the network. On the client side we can mount the NFS filesystem just like any other regular partition. In this brief post I’d like to outline the main steps how we can set up an NFS server as well as how we can mount the filesystem persistently on the client side. Let’s start with the server: we need to install the following package first:
viktor@NFSServer:~ $ sudo apt install nfs-kernel-serverAfter it has been successfully installed we need to edit a particular file to be able to share files over the network, this file is called /etc/exports. In this case I’m sharing the /TESTSHARE directory with the host with IP address of 192.168.1.56. We could have specified a whole network here, like 192.168.1.0/24, or simply *, which means that we don’t restrict who can access the filesystem. As it can be seen, NFS works differently than Samba: NFS allows or denies access for individual hosts or networks while Samba authenticates individual users, NFS doesn’t work like that. So I appended the following line to the exports file:
root@NFSServer:~# echo "/TESTSHARE 192.168.1.56(rw,root_squash,async)" >> /etc/exportsIt’s worth noting the >> operator, which means the STDOUT of the echo command is going to be appended to the exports file. Don’t confuse with the > operator which will simply overwrite the file, losing all of its contents. Within the parentheses we can specify options regarding this share. One can probably guess, rw means that we allow read-write access, root_squash and async is bit more complicated. root_squash means that we basically treat the root user of the server and the root user of the client separately: the root of the client doesn’t have the same permission on the shared filesystem as the server’s root does. If want the same level of root access on the client side as well, simply specify no_root_squash. With the async option specified we write the changes of the filesystem not immediately to the disk itself, but the changes are held in the RAM, which allows better performance. The disadvantage is that in the event of a system crash data can be lost.
I created a directory for this share, applied very loose permissions to it (basically everyone can do anything with this share), and created a testfile which we can open later on the client side as a proof.
viktor@NFSServer:~ $ sudo mkdir /TESTSHARE
viktor@NFSServer:~ $ sudo chmod 777 /TESTSHARE
viktor@NFSServer:~ $ echo "This is just a testfile for NFS testing" > /TESTSHARE/NFS_testfile
Now let’s start the NFS service on the server side and make sure it’s running properly.
viktor@NFSServer:~ $ sudo systemctl start nfs-kernel-server
viktor@NFSServer:~ $ systemctl status nfs-kernel-server.service
● nfs-server.service - NFS server and services
Loaded: loaded (/lib/systemd/system/nfs-server.service; enabled; vendor pr>
Active: active (exited) since Mon 2024-01-22 20:12:41 CET; 3 days ago
Process: 532 ExecStartPre=/usr/sbin/exportfs -r (code=exited, status=0/SUCC>
Process: 538 ExecStart=/usr/sbin/rpc.nfsd $RPCNFSDARGS (code=exited, status>
Main PID: 538 (code=exited, status=0/SUCCESS)
CPU: 36ms

Jan 22 20:12:40 NFSServer systemd[1]: Starting NFS server and services…
Jan 22 20:12:40 NFSServer exportfs[532]: exportfs: /etc/exports [1]: Neither 's>
Jan 22 20:12:40 NFSServer exportfs[532]: Assuming default behaviour ('no_subt>
Jan 22 20:12:40 NFSServer exportfs[532]: NOTE: this default has changed since>
Jan 22 20:12:41 NFSServer systemd[1]: Finished NFS server and services.
We need to read the contents of the /etc/exports file with the following command:
viktor@NFSServer:~ $ sudo exportfs -r
exportfs: /etc/exports [1]: Neither 'subtree_check' or 'no_subtree_check' specified for export "192.168.1.56:/TESTSHARE".  Assuming default behaviour ('no_subtree_check').  NOTE: this default has changed since nfs-utils version 1.0.x
and display our active shares:
viktor@NFSServer:~ $ sudo exportfs
/TESTSHARE 192.168.1.56
That’s all we needed to do on the server, now let’s mount this share on the client side, we need to create an empty directory for that:
viktor@viktor-Latitude-E5570:~$ sudo mkdir /mnt/CLIENT_TESTWith the showmount command we can query a particular server for shares:
viktor@viktor-Latitude-E5570:~$ sudo showmount -e 192.168.1.97
Export list for 192.168.1.97:
/TESTSHARE 192.168.1.56
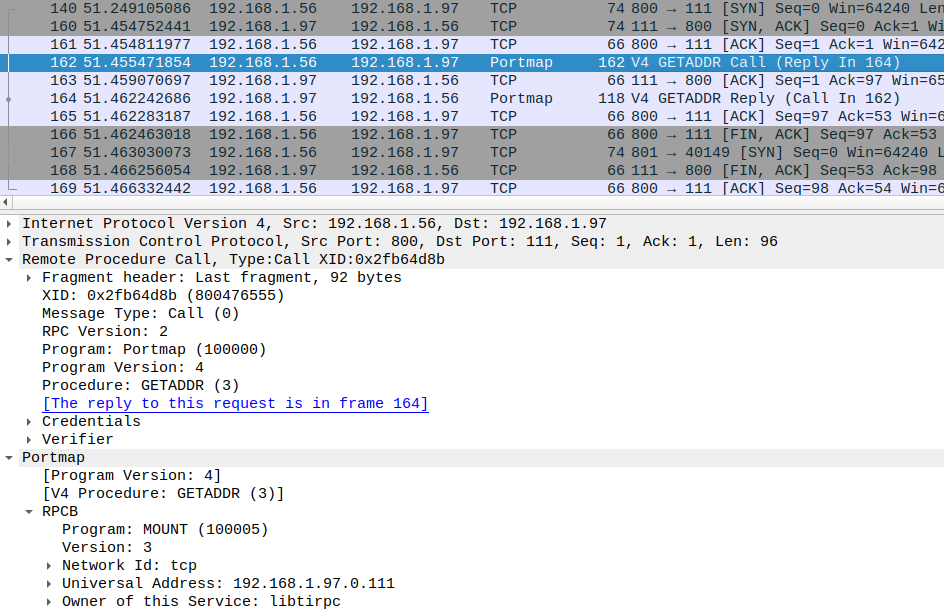
It’s worth to take a look at the protocol we’re using here: as it can be seen from this packet capture we’re utilizing Remote Procedure Calls (RPC) and Portmap over TCP. As the output of the showmount command shows, we can access this share over the network, now we need to mount it on the client:
viktor@viktor-Latitude-E5570:~$ sudo mount 192.168.1.97:/TESTSHARE /mnt/CLIENT_TEST/
viktor@viktor-Latitude-E5570:~$ cat /mnt/CLIENT_TEST/NFS_testfile
This is just a testfile for NFS testing
viktor@viktor-Latitude-E5570:~$ echo "Testing from the client" > /mnt/CLIENT_TEST/client_testfile
As we expected we can view the contents of the file created on the server.
viktor@NFSServer:~ $ ls -l /TESTSHARE/
total 8
-rw-r--r-- 1 viktor viktor 40 Jan 22 18:12 NFS_testfile
-rw-rw-r-- 1 viktor viktor 24 Jan 22 18:39 client_testfile
And it works as it should on the server side as well, the file created on the client is present here as well. NFS works the same way as a USB or hard drive, it has its own filesystem (since the name Network File System). Running the df command on the client we can check and verify the free storage space on the server side:
viktor@viktor-Latitude-E5570:~$ df -h | grep SHARE
192.168.1.97:/TESTSHARE 30G 5,0G 23G 18% /mnt/CLIENT_TEST
Similarly to any other block device we also can mount this share persistently modifying the /etc/fstab file. To do that we need to run the following command as root, or simply open the file with a text editor and modify manually:
echo "192.168.1.97:/TESTSHARE /mnt/CLIENT_TEST nfs defaults 0 0" >> /etc/fstabAfter modifying the fstab run the following command to reread the contents of the file:
viktor@viktor-Latitude-E5570:~$ sudo mount -aNow the NFS share will be mounted automatically after system reboot.