How to set up the firewall of your server with iptables and configure your SSH access to make more secure
In this post I would like to show you how to set up the firewall of your VPS and restrict its SSH access from zero. This is the way I do it, it doesn’t mean it’s the only viable solution, it can be done by using ufw firewall or generating RSA key pairs for SSH. I’m not a network engineer, so it could be that I’ve omitted something important, but my configuration usually works. (Note: I’ve tested these commands on Debian 10 Buster, it could be that some commands won’t work on other distros)
1. Create a new user with sudo privileges
So let’s begin: you’ve got your root user and password, and you can ssh into your server via the default port 22. Later we’ll restrict root’s ssh access, so we create a new user and provide them sudo privileges:
adduser <your new username>
usermod -aG sudo <your new username>
As password I recommend giving something really hard, with lots of special characters, numbers and so on… later it’ll depend on this password how easily your server can be broken. (An other solution to generate RSA key pairs, and authenticate yourself with them and disallow password authentication). You can try your new user, close the ssh session with your root user and start a new one with your new user: ssh <your new username>@<your server's IP>.
2. Change your server’s hostname
It’s not a ‘must have’ thing, but it can be annoying for some to have a random hostname after the ‘@’ character like ‘vps69420’ or something like that. You can change that by editing the following files:
nano /etc/hostname
nano /etc/hosts
You just simply delete the old hostname and write your new one into the first file. In the hosts file you can define a new alias for your localhost (127.0.0.1), after the localhost row (don’t delete it) insert a new one with your new hostname like this:
127.0.0.1 <your new hostname>
You can test your new hostname by pinging it.
3. Install iptables
Next we’re going to install iptables, and other tools required for saving our configuration, and loading it automatically after reboot:
sudo apt install iptables netfilter-persistent iptables-persistent
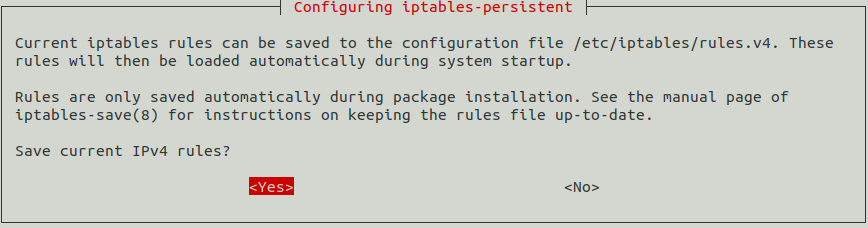
You will be asked the following question, say yes, but it’s doesn’t ever matter, because we haven’t defined any rules yet. With iptables-persistent we can easily save the current configuration and it’ll be loaded automatically after system reboot.
4. Define iptables rules, restrict incoming traffic
Now that we have iptables installed, we can check our server’s socket statistics by typing the following command:
sudo ss -tupln
Its output will look something like this:

It shows that our SSH is listening on port 22. If you have a webserver for instance you’ll see it here (port 80 or 443 for https), but usually if you have a fresh system only ssh will be displayed here. Let’s check our firewall with the following command: sudo iptables -L: you’ll see that that all 3 chains (INPUT, OUTPUT, and FORWARD) are open (policy is ACCEPT), and no rules have been defined yet.
Now we can add new rules to our firewall, we’ll drop all packets, except packets which are necessary for the ssh by typing the following commands (order is really important here!):
sudo iptables -A INPUT -m state --state ESTABLISHED,RELATED -j ACCEPT
sudo iptables -A INPUT -s 127.0.0.1 -j ACCEPT
sudo iptables -A INPUT -p tcp --dport 22 -m state --state NEW -j ACCEPT
sudo iptables -P INPUT DROP
sudo iptables -P FORWARD DROP
With the first command we accept the packets for connections that have already been established, so we won’t get locked out from our system. With the second command we allow all traffic from the loopback interface, this is essential for certain applications. With the third command we allow connections to our SSH with the destination port 22 (we’ll change that later). With the last 2 command we set the policy for the INPUT and the FORWARD chain: we drop every packet except packets which fit the first 3 rules we defined above. Be aware: if you define the policy first you’ll get locked out from your system, so order really matters here. If you want to operate a webserver for instance you don’t have to care about the FORWARD chain that much (just set it’s policy to DROP), but if you want to set up your own VPN (with Wireguard or OpenVPN for instance) you’ll need the FORWARD chain to define the NAT rules (I might write a post about it later). Now let’s check the firewall by typing: sudo iptables -L:
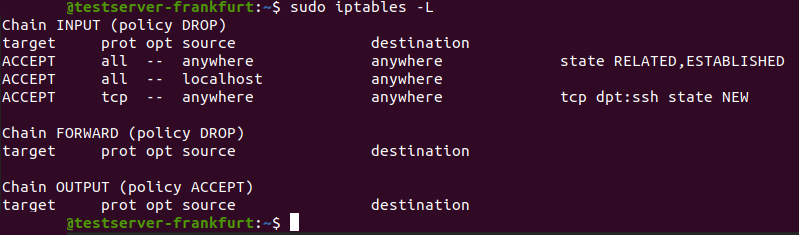
We can see the rules and policies we defined above. To save the rules type the following command:
sudo netfilter-persistent save
By doing this the rules above will be automatically applied after system reboot. Notice that our server can’t be pinged now, because we drop all ICMP packets as well. How can we make our system capable of answering to pings (ICMP echo-requests)?
sudo iptables -A INPUT -p icmp --icmp-type echo-request -j ACCPET
With this rule the server can be pinged now. You can delete this rule by typing the following (put “-D” (for delete) instead of “-A” (add)):
sudo iptables -D INPUT -p icmp --icmp-type echo-request -j ACCEPT
5. Configure SSH service
Now let’s harden our SSH: we’ll change it’s port number, so first we’ll define a new firewall rule:
sudo iptables -A INPUT -p tcp --dport 9876 -j ACCEPT
In this example we’ll use the port 9876 for the ssh. Feel free to use whatever you like just change it from the default 22. If someone really wants to find which port your ssh is listening at, they’ll find it by port scanning (nmap), but it’ll save you from automated attacks. Now we can configure the SSH: open the /etc/ssh/sshd_config file with a text editor:
sudo nano /etc/ssh/sshd_config
Edit and uncomment (by deleting the ‘#’ character) the following lines as below:
Port 9876
AddressFamily inet
PermitRootLogin no
In the first line we define the port number SSH is listening at (it should be the same as above in the iptables rule, otherwise you’ll be locked out), with the second line we specify which type of IP address SSH is using (inet = IPv4 only, if you use IPv6 don’t make this change). Finally we restrict root login for SSH, and restart the SSH service by typing:
sudo systemctl restart sshd.service
6. Additional iptables rules
Now that we’ve changed the port number for SSH, we don’t need to enable the default port 22 anymore, you can simply delete it by typing the rule above with “-D”:
sudo iptables -D INPUT -p tcp --dport 22 -m state --state NEW -j ACCEPT
IP packets can also be logged with IP tables: for instance let’s log packets to port 9876. We need to insert the following rule:
sudo iptables -I INPUT 3 -p tcp --dport 9876 -j LOG --log-prefix "ssh_test "
With iptables the order of the rules really matters, that’s why we need to insert this rule to third position before the ACCEPT rule:
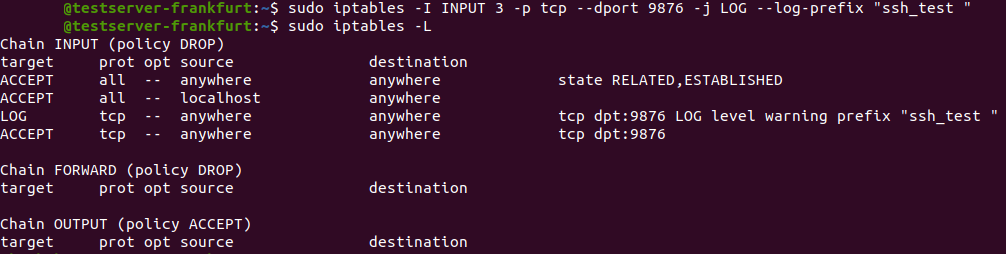
Now if you start an SSH session, IP packets to port 9876 will be logged, you can see the logged packets in the /var/log/messages file by typing:
sudo cat /var/log/messages | grep ssh_test