Model-Driven Configuration part 1: Implementing RESTCONF on IOS-XE
This post is the first part of a series where we're going to explore YANG models and take look at how we can configure IOS-XE devices using a model-driven approach. In the first part we'll use the RESTCONF protocol to get information and also to change the configuration of IOS-XE devices which will be the CSR1000v routers in GNS3 in this case. Unlike the traditional CLI-based approach of network automation (like sending CLI commands explicitly to devices with netmiko for example), with YANG and model-driven automation we send structured, predefined data to the boxes usually in JSON or XML format. YANG with a tree-like hierarchical structure provides the template for the data we send or receive from the devices. So YANG is nothing more than a data modeling language and the two, most prevalent protocols utilizing YANG are NETCONF and RESTCONF. In this particular post we're going to focus on RESTCONF, and I'll show a few methods how we can interact with the networking devices using the RESTCONF protocol: we'll take a look at Postman, Python scripts using the requests library and I'll also show cURL CLI tool in the Linux terminal.
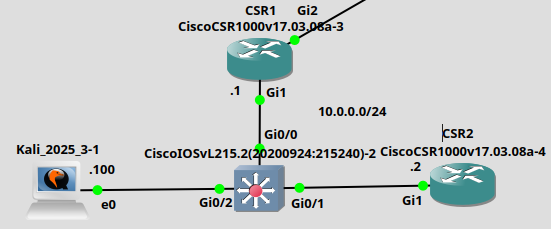
The topology of this lab is very simple, we basically have two CSR routers in the same subnet, and we'll use the Kali Linux machine as the management station:
1. Enabling and verifying RESTCONF on IOS-XE
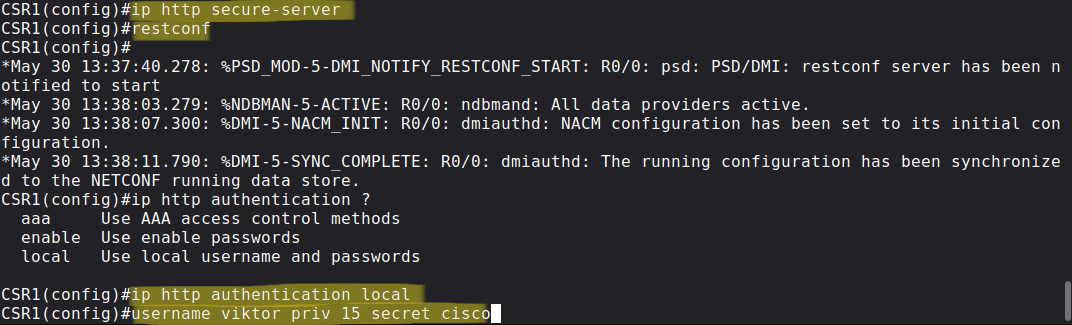
RESTCONF uses HTTPS as the transport protocol, so we have to enable the secure HTTPS server which is an nginx proxy server on IOS-XE which forwards the validated requests to the internal DMI (Data Modeling Interface) of the device. The SSL certificate will be created automatically and the HTTPS server will listen on standard TCP port 443. After starting the HTTPS server we can enable RESTCONF with the simple restconf command. Finally at the end I create a new user with privilege level 15 and select the local database for authentication to the HTTP server.
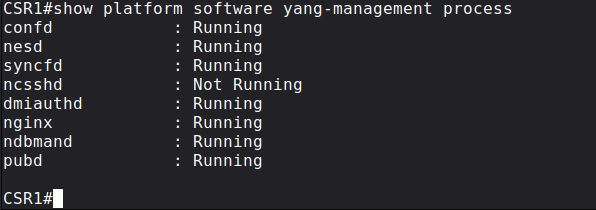
For verification we can use the following command, and make sure every process is running except the ncsshd which is the NETCONF SSH daemon which will be required when we want to use NETCONF.
2. Making the first API call to IOS-XE using Postman
Postman is one of the most well-known programs of testing and developing REST-based APIs. RESTCONF is also RESTful protocol adhering to the REST framework, so we'll send HTTP Requests with Postman and receive HTTP Response from the networking devices. In this context, Postman will be our HTTP client which we'll use to make API calls to the routers to retrieve operational/configuration data and also to send configuration data as well in JSON or XML format.
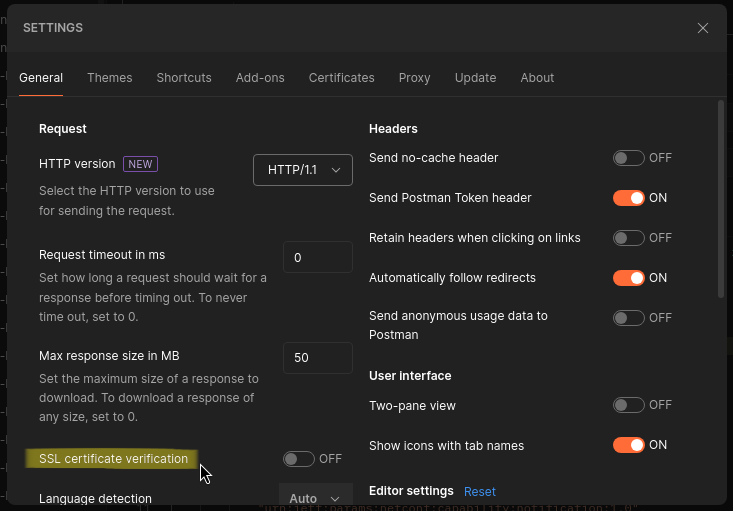
Before we start using Postman we'll disable SSL certificate verification because the CSRs only have a self-signed certificate which Postman can't verify, alternatively we can also set up a PKI and generate certificates for each device:
Next let's make our first API call with Postman: let's list all of the YANG models the CSR1000v supports. For this we use the following URI: /restconf/data/netconf-state/capabilities.
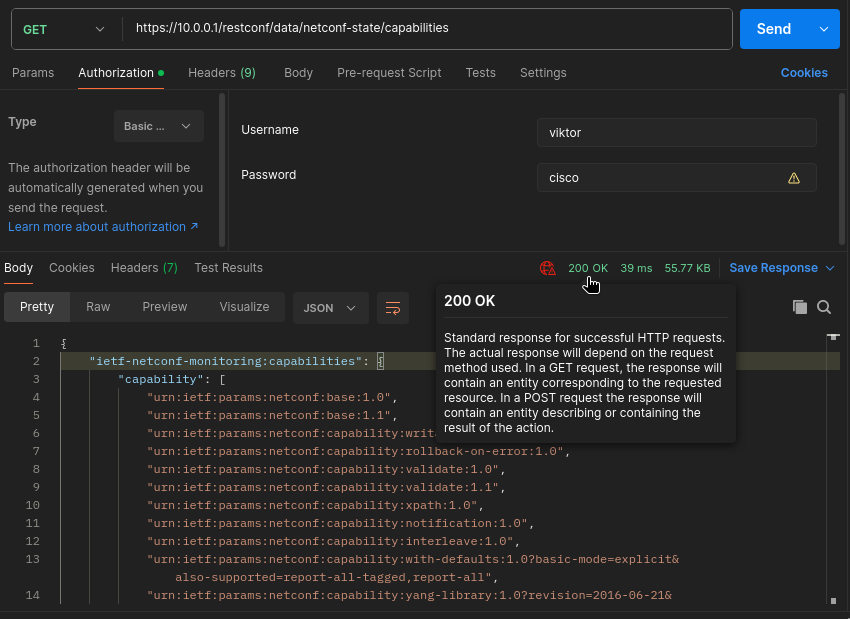
Notice that the URIs have well-defined structure: after the first "/" we have the root which will be always restconfon IOS-XE and after that comes the datastore which is simply data in this case. After the datastore comes the YANG module and the container and optionally any leafs defined in the container. But in this case we don't use any YANG model, but we list the device capabilities and the YANG models the device supports. Notice that this HTTP request has nothing to do with the NETCONF protocol, but it simply lists the capabilities associated with NETCONF (like supported datastores, NETCONF versions supported etc.), and also the YANG models which both protocols can use. Before we send the GET request we have to specify our credentials under the Authorization tab: we use Basic Auth in this case which is basically just a Base64 encoded string of our username and password. And after hitting the Send button the device sends back the HTTP response with the response code of 200 OK indicating that the request was successful.
Notice that the router sends back the payload in JSON format, I specified that under Headers tab before I sent the request:
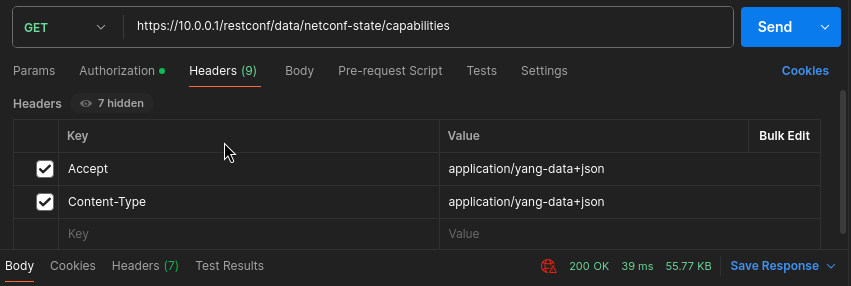
With the Accept header we specify in which format we want the router to send back the payload, and with the Content-Type header we specify in which format we use for our payload when we send requests using the POST, PUT or PATCH methods. Since this is a GET request with no payload, the Content-Type header doesn't make too much sense here, but it'll be used on later requests when we send actual data to the device.
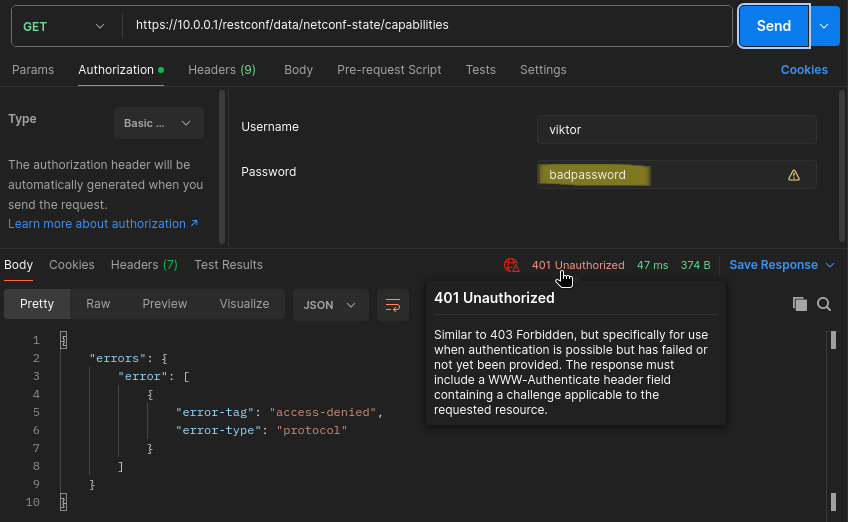
As with any other REST-based APIs, the server (in this case the CSR router) sends back a HTTP response code indicating whether the request was successful or it encountered any problems processing our request. If our GET request was successful we always get back a 200 OK response code. But let's take a look at few examples what happens if something goes wrong.
If I provide a wrong username or password the router sends back a 401 - Unauthorized response code with "access-denied" in the payload:
Or if I try to authenticate with privilege level 1 user like this:
CSR1(config)#username level1user priv 1 secret cisco123
the device sends back a 403 - Forbidden:
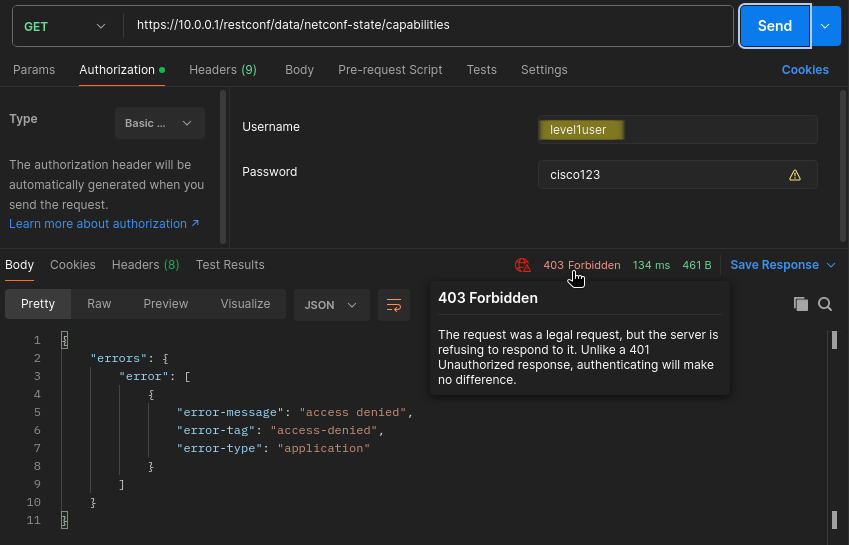
403 indicates that the authentication was successful (we provided the appropriate username and password), but the authorization was not, and we don't have access to the requested resource what we specified in the URI. So there is a slight difference between the two, some REST APIs always send just back the 401 (or sometimes the 404) if the user doesn't have access to the resource regardless whether the authentication was successful or not.
3. Extracting data from CSR1
Now let's actually get some data from the router. Unlike NETCONF, RESTCONF doesn't actually distinguish operational data from state data, we use the same GET method for both of them. So let's start with the operational data: first we extract some interface statistics from CSR1. For this we'll be using the ietf-interfaces YANG module, which is a vendor-agnostic module, that is we could use this for any kind of device (Juniper, Nokia, Huawei etc.), it is not Cisco-specific, everything which starts with "ietf" is vendor-independent.
Next we clone the whole https://github.com/YangModels/yang.git repo, and navigate to our vendor and OS and choose our image version. In my case this is the /vendor/cisco/xe/1711 , here we can find all of the YANG module this version of IOS-XE supports. To get to know the hierarchical structure of the ietf-interfaces module, we use the pyang tool, which prints use the whole module in a tree-like structure like this:
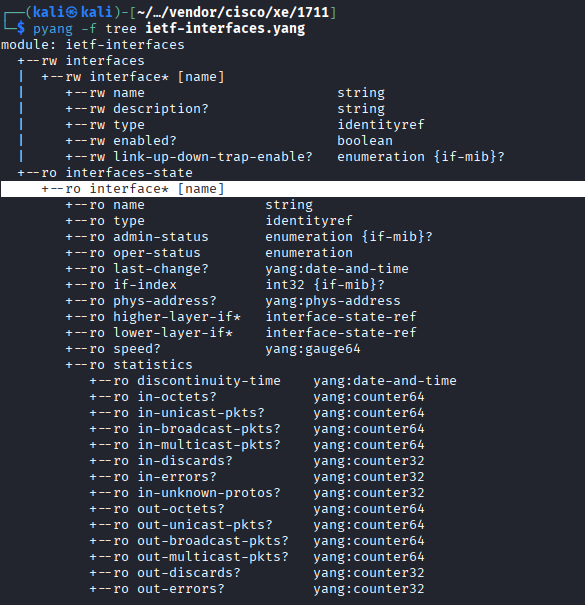
Now we have the idea how we should craft our URI which we would use with the GET method. After the /root/datastore (which is always /restconf/data on IOS-XE) comes the YANG module which is ietf-interfaces, next comes a colon (:) instead of a forward slash (/) and then the container. This module has two containers: interfaces and interfaces-state. The interfaces container, as indicated by the rw (read-write), can be used to actually configure the device (create a new interface, change description, shut it down etc.), while the interfaces-state (as indicated by the ro), is purely used to get operational data from the device (interface state, statistics etc.). NETCONF makes a clear distinction between these two, with RESTCONF we cannot use POST or PATCH methods on the ro (state) data for example, but we can use the GET on both. If we tried to use the POST, PUT or PATCH methods on the read-only operational data, we would get the 405 - Method Not Allowed response code. The interface* under the container is a list, which contains many leafs. Leafs are on the lowest level in the hierarchy, they have a single value which can be an integer, a string, a boolean and a few others. The asterisk (*) and the [name] between box brackets here indicates that we have to provide the particular interface (GigabitEthernet1 on the CSR for example). So the whole URI would look like this in our case: /restconf/data/ietf-interfaces:interfaces-state/interface=GigabitEthernet1.
Alternatively we can also use YANG Suite from Cisco to examine YANG models. We can spin this up as a Docker container, here is the description how we can set this up: https://github.com/CiscoDevNet/yangsuite/. Moreover we can also use this tool to send data/extract data from the device using either NETCONF or the RESTCONF protocol. Here I loaded up the same ietf-interfaces YANG module:
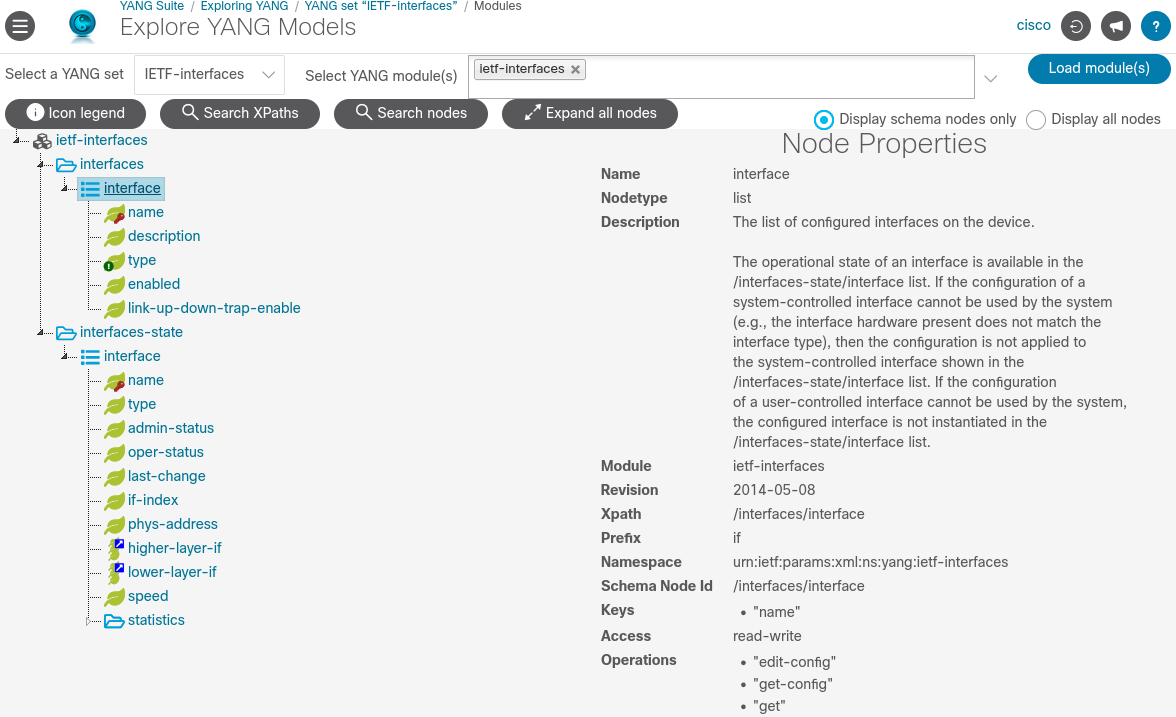
As you can see this provides much more details: it lists the node type (interfaceis a list), the supported operations ("get", "get-config", "edit-config") which will be relevant for NETCONF, and the key leafs for this list. In this case we have to provide the interface name if we want to extract interface statistics for a particular interface for example, which sounds logical. Without the key leaf we would list all of the interfaces configured on the router. So to get all of the operational info of just a particular interface (GigabitEthernet1) of CSR1, our URI and GET request would look like this:
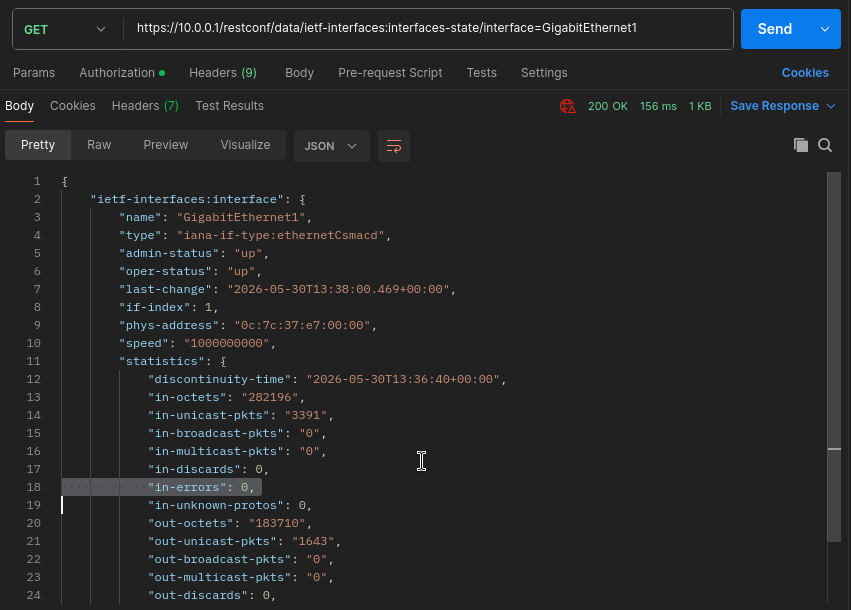
CSR1 sends his payload in the HTTP response in JSON format, because previously we specified this in our Accept header (application/yang-data+json). So CSR1 returns every leaf which are under the interface list, we can see the oper/admin state of the interface, MAC address, speed, packet counts, error statistics etc.
Instead of sending the GET request with Postman, we can also use the curl CLI tool in the terminal to basically do the same thing, but here we have to manually specify all of the headers and other parameters:
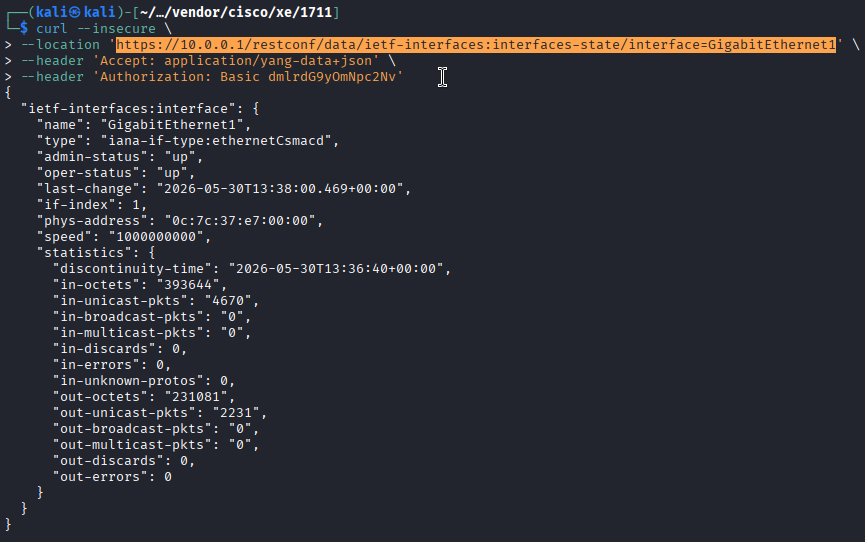
Remember here with the Authorization header we specify Basic authentication, which is just the Base64 encoded string of the username:password, it is not encrypted, it is easily reversible.
Now let's see another example for state data, this time we'll use the Cisco-IOS-XE-bgp-oper YANG module to get BGP-specific data from CSR1. Unlike to previous IETF module, this one is a vendor-specific YANG module which can be only used with Cisco IOS-XE devices. With this one we can extract a lot of BGP data from the router, the tree-like structure of this model looks like this:
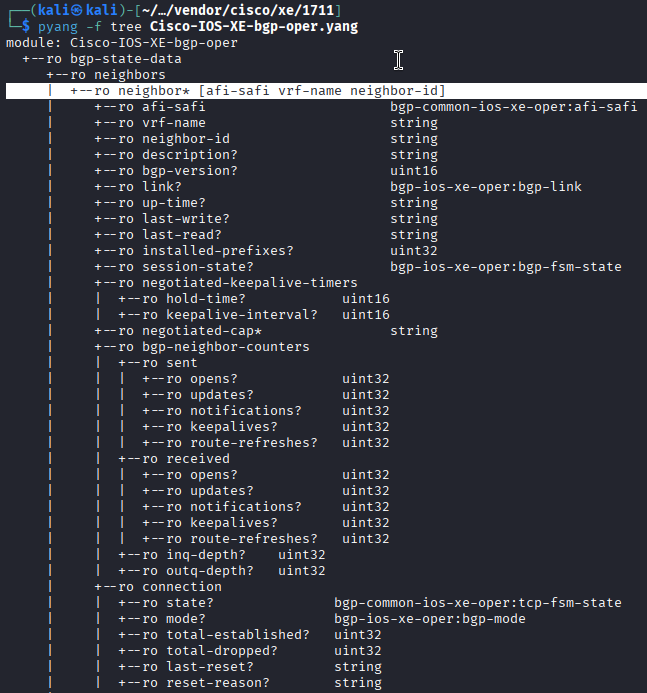
As we've learned from the previous example, here we have to provide three keys to get the BGP data from a specific peer: the AFI/SAFI, the VRF name, and the neighbor ID. We do this by simply separating the three values by commas (,), so our URI would look like this:
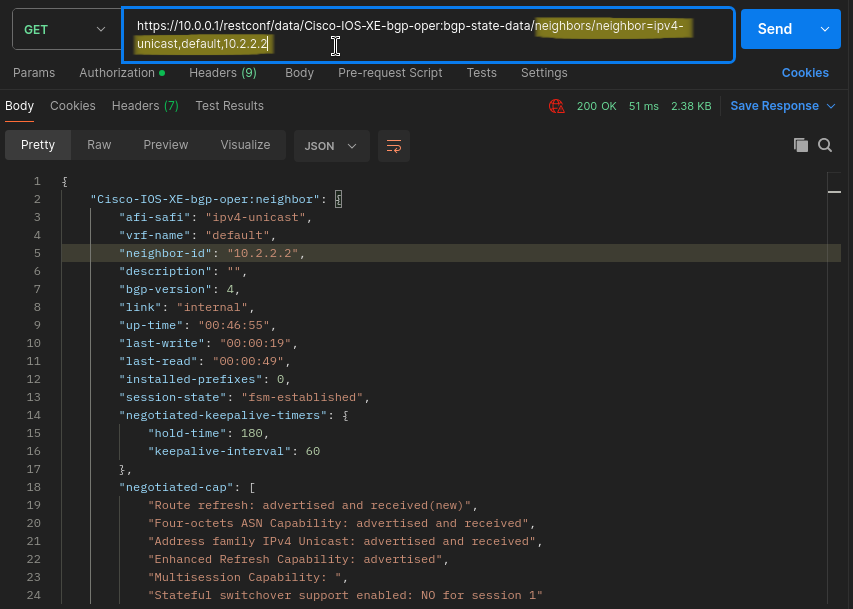
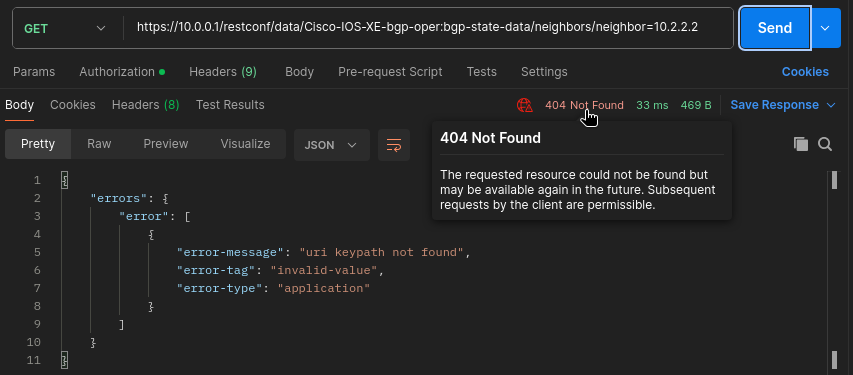
Here we have to provide the exact three value, if we missed one or sent the request just with the neighbor ID, the CSR router would return a 404 - Not Found response code:
4. Changing configuration data on the CSR
In the previous chapter we've seen how we can extract data from the router using the HTTP GET method, now let's actually send data to the router to change its configuration. Unlike NETCONF, we don't have the concept of datastores with RESTCONF, so we're always going to change the running configuration of the device, that's our only option. In our next example we're going to create a new loopback interface on the router using the same ietf-interfaces YANG module. To achieve this we have to use the POST method to create a new resource. Since we have already specified the Content-Type header as "application/yang-data+json", we have to provide the body of our HTTP request in JSON format. This time we'll be using the interfaces container within the YANG module, notice that it has the "rw" attribute, so that it allows us to modify the configuration of the router. Now we have to create our JSON payload using the hierarchical structure of the ietf-interfaces YANG module.
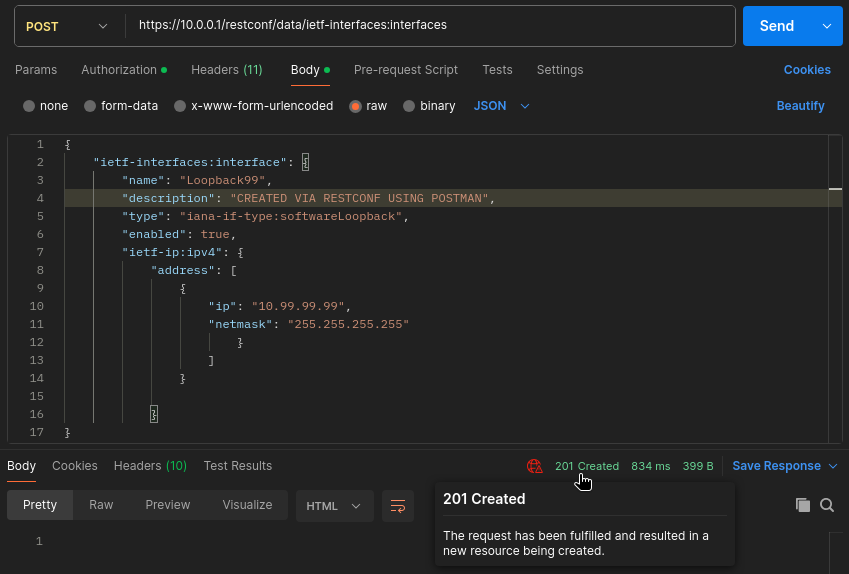
If our request was successful, the router sends back a 201 - Created response code. If we send invalid JSON data to the router, or we make a typo with the key-value pairs, the router sends back a 400 - Bad Request response. If we go back to the CLI of CSR1, we can verify that the new loopback99 interface has been created successfully:
4.1 Idempotency of the POST method
An interesting thing about the POST method is that, unlike the GET method, it is not idempotent. What does this mean? If we sent the same GET request to the router hundred times, it would return the SAME GET response hundred times. That's not true for the POST method. If I send the same POST method again, the router returns 409 - Conflict, indicating that this resource already exists:
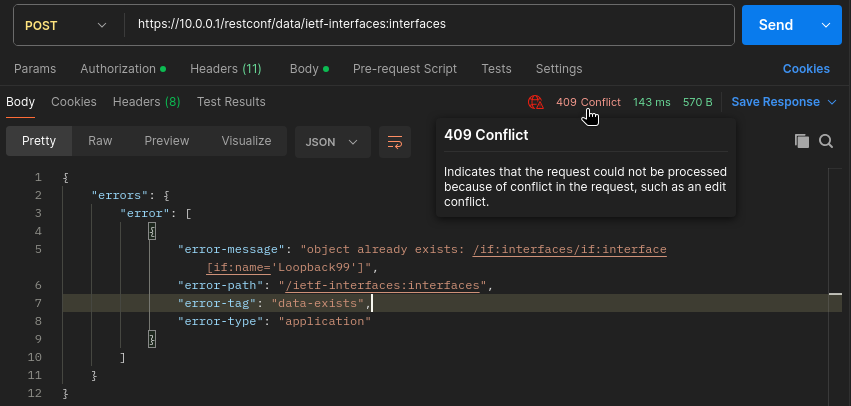
It's obvious, you cannot create the same Loopback interface twice. The other method which can be not idempotent is the PATCH method which I'll show later. All other methods are safe and idempotent, meaning doesn't matter how many times we send them, the result will be the same each time.
4.2 PUT vs. PATCH
Now let's take a look how we can modify an existing object, in our case let's modify the description and the IP address of our Loopback99 interface. We wouldn't send a new POST request to do this, we've seen that it would result 409. We have two choices to change Loopback99: we could either use the PUT or the PATCH method. What's the difference? Let's start with the PUT: the PUT replaces the whole resource, in this case the Loopback99 interface, or it would create it, if it didn't exist in the first place. Meaning that if I missed the description or the IP address keys in the JSON payload, the router would delete that information from the interface. So it is basically the same as the POST, but we can use it on an existing resource also:
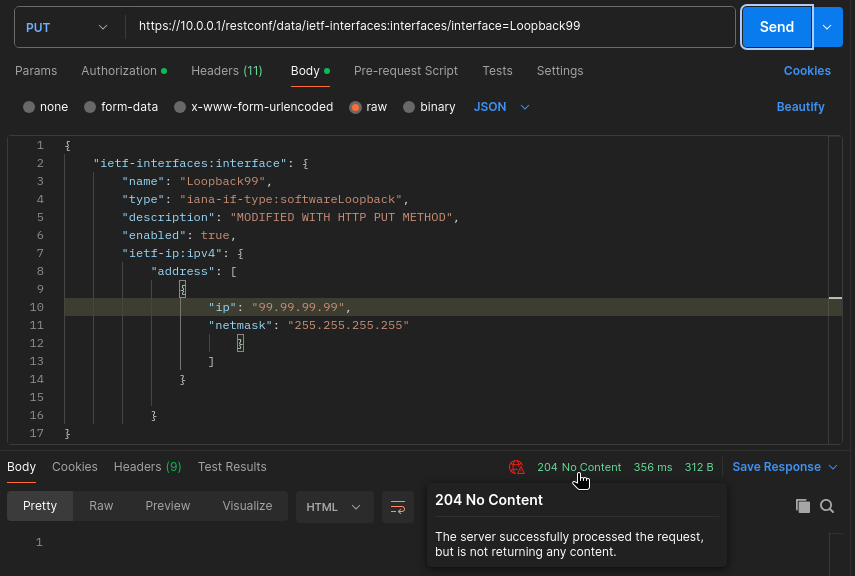
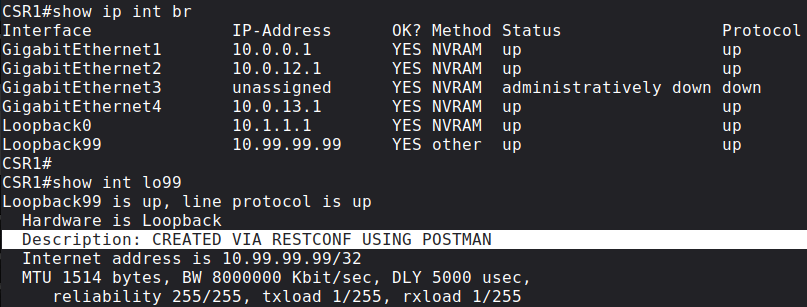
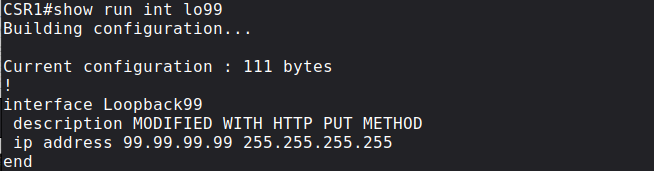
Notice the URI, this also different: we have to explicitly target the resource in the URI with the interface=Loopback99 , we didn't do this with the POST. In case of successful request, the routers sends back 204 - No Content, which can be a bit misleading. Because we would get back the same status code using the DELETE method, we could think that we deleted the Loopback interface, but that's not true. For verification we can use the CLI again, and make sure that we still have Loopback99 on the router with the modified IP address and description:
This time let's try the PATCH method. For example we want to shut down the interface, but we want to keep its configuration (IP address, description etc.), to do this we could use the PATCH. So with this one we target the same URI, and use the same payload format, but this one doesn't replace the resource completely, but it merges the payload of our request with the current configuration already present on the router.
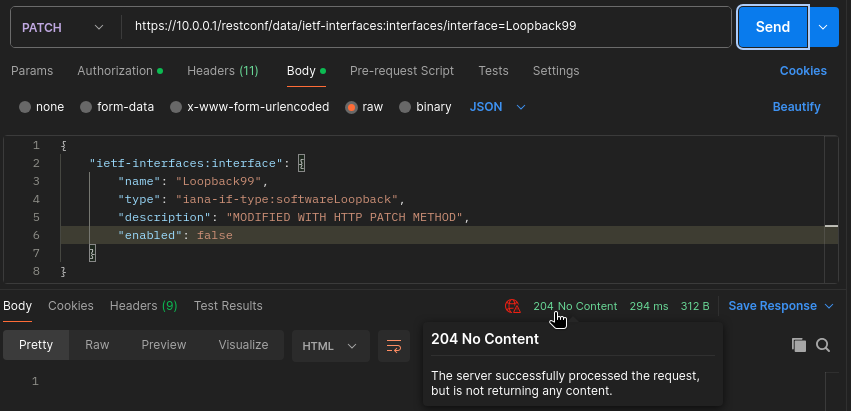
With the "enabled": "false" key-value pairs we put the interface into the admin down state, and change the description. Notice that this JSON payload above doesn't contain any IP address information. Would the IP address be removed from the interface? No, remember this one only merges with the current configuration, unlike the PUT, this one doesn't remove everything. So we can verify with the CLI that the IP address is still present on the router, but the Loopback99 interface is now in the admin down state:
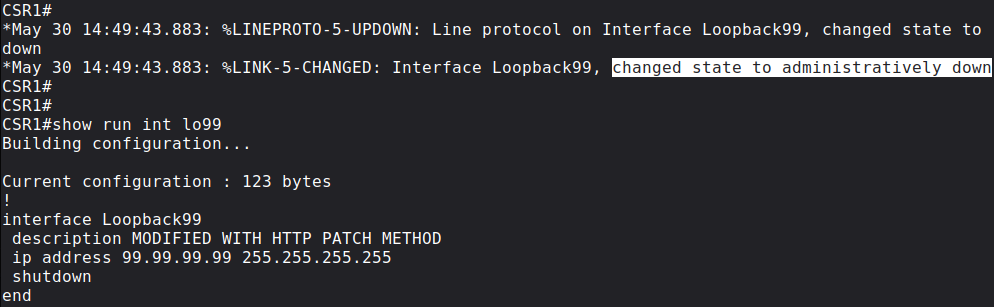
Notice the modified description and the "shutdown" command under the interface.
Finally let's delete this loopback with the DELETE method: just like the POST, we target the interface in the URI:
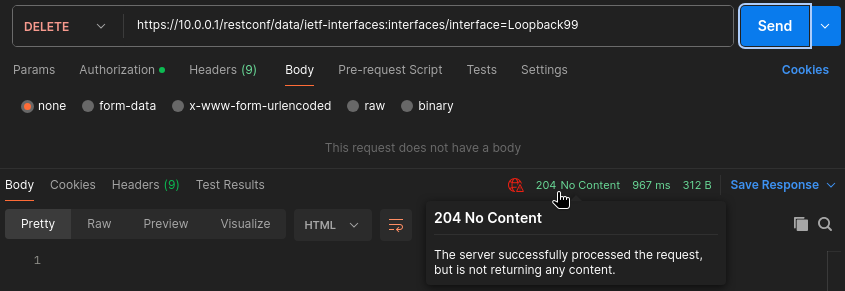
If the operation was successful, the router sends back the 204 - No Content status code.
5 Python scripts with the requests library
We can also send API requests and automate networking devices using the requests library in Python. In the followings I show a few examples how we can interact with the IOS-XE routers using the RESTCONF protocol.
You can download every Python script I show in this lab from my GitHub repo.
5.1 Getting the loopback0 address of each router
First let's get the loopback0 interface of each router using the GET method:
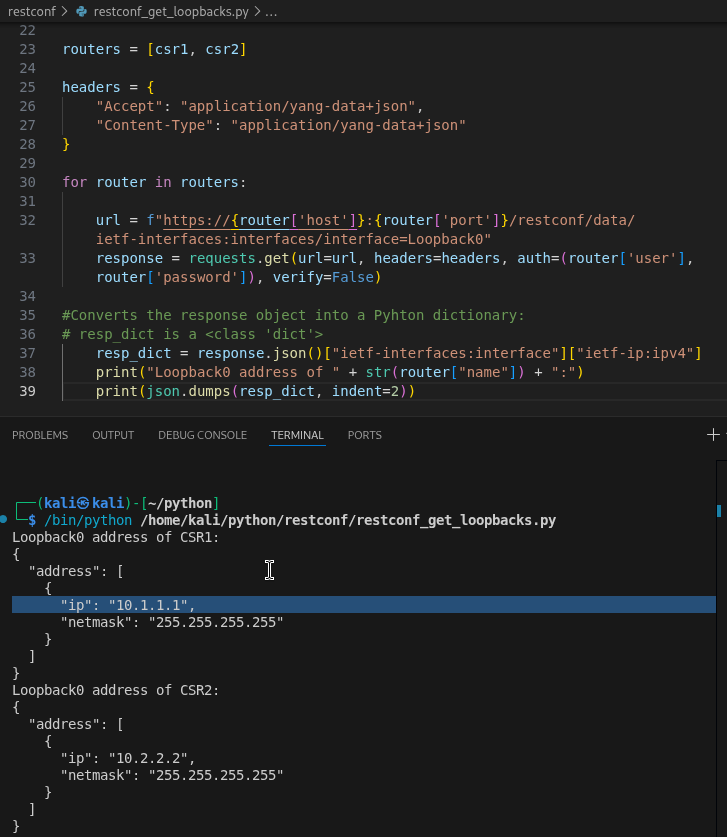
Notice that by using the for loop, this a scalable method to get the interface data of all of the routers. We can easily add new routers to the routers list in the script. We can add our username and password statically in plain text just like I did in the script (which is not a good practice in a real production network), or we can use the getpass library for example and provide our credentials each time before running the script. Either way, by using the .json() method on the response object, we convert it into a Python dictionary, so that we can extract data easily knowing our key-value pairs. Finally we use the .dumps() method from the json library to print the resp_dict dictionary in JSON format using some indentation so that it can be much more readable.
5.2 Creating a new loopback using the POST method
Next let's create a new loopback99 interface on CSR1: similarly to the previous example, here we create our payload as a Python dictionary and we convert it into a JSON string using the .dumps(), and pass it to the requests.post() object as an argument:
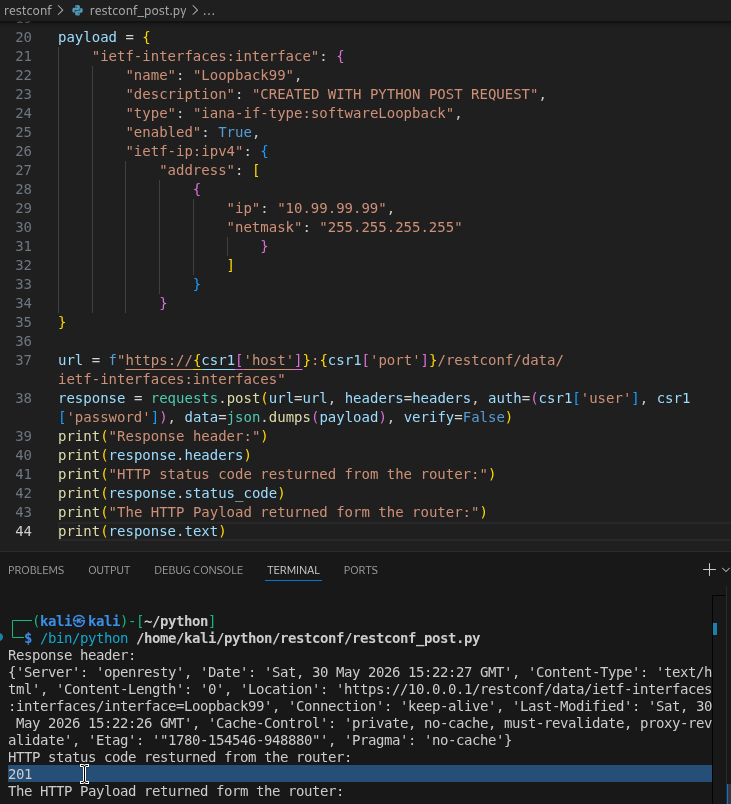
We can use the following built-in methods on the response object: with the .headers we just print the headers of the HTTP response from the router, the .status_code returns the status code as an integer, and the .text returns the payload of the HTTP response from the router. The 201 (Created) status code indicates that the new resource (the loopback99 interface) has been successfully created on the router, and the router sends the HTTP response with an empty payload.
5.3 Modifying Lo99 with HTTP PATCH
Now let's use the PATCH method to modify this new Loopback99 interface:
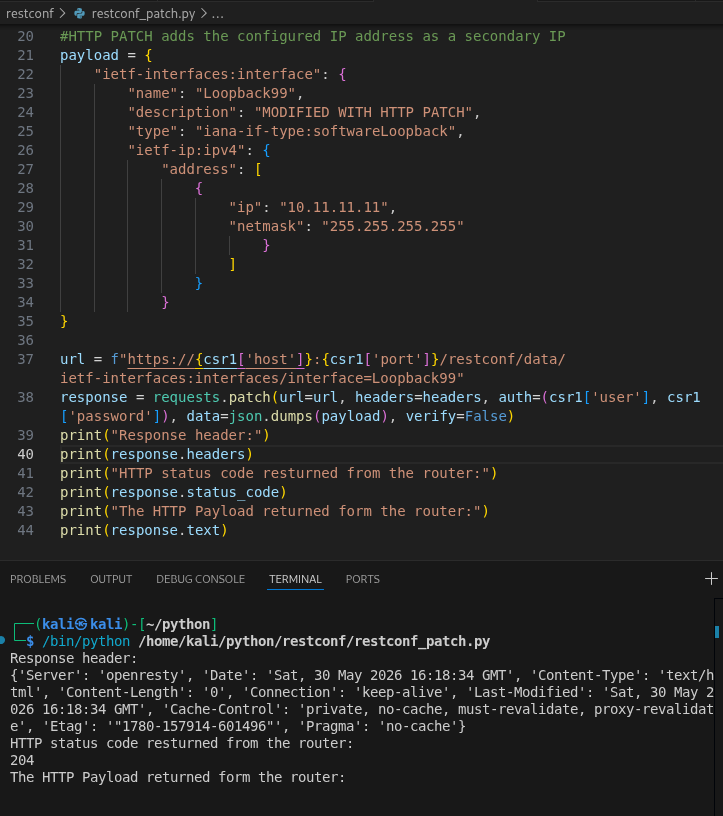
Just as we've seen with Postman, the router returns 204 (No Content) with an empty payload. Notice that if we had used PUT instead of PATCH, this script would have changed the IP address of the Lo99 interface. But this is not the case with PATCH, this script, besides changing the description, adds a new secondary IP address to the Lo99 interface:

And this is why, similarly to the POST, the PATCH method is also not idempotent: using the PATCH multiple times on the same resource could update the resource each time to a different state.
5.4 More Python scripts
5.4.1 Searching for a given prefix in each router's RIB
In this last chapter let's see two more Python scripts that are a bit more advanced than the previous ones. I created a script where a user enters a prefix (1.1.1.1/32 for example), and the scripts asks each router whether that prefix is present in their RIB. So this could be used for troubleshooting purposes, when we want to verify that each router in our network knows a given route. For this script we're using the ietf-routing YANG model. Again, just as the previous ones, this is a vendor-independent model, so we can use this in an inhomogeneous environment where we have routers from different vendors:
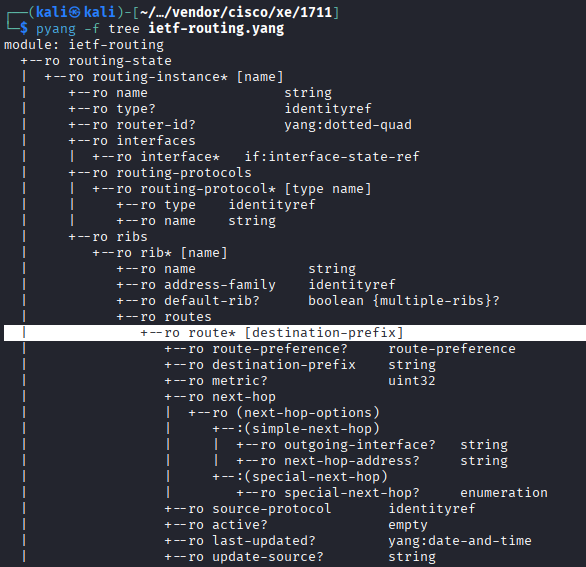
ietf-routing YANG modelWe can easily recognize, that we have to use the routing-state container, for the routing-instance list we have to define the name, which is the key leaf. This is the VRF where we want to search for the prefix. We want to search in the GRT, so we use the default keyword. Under the ribs list, again we have to provide the value of the name leaf. This is used for the address family, since we want to find an IPv4 prefix, we use the value ipv4-default. So our final URI will look like this:
/restconf/data/ietf-routing:routing-state/routing-instance=default/ribs/rib=ipv4-default/routes/route=<prefix in X.X.X.X/Y format>
And this is the Python script:
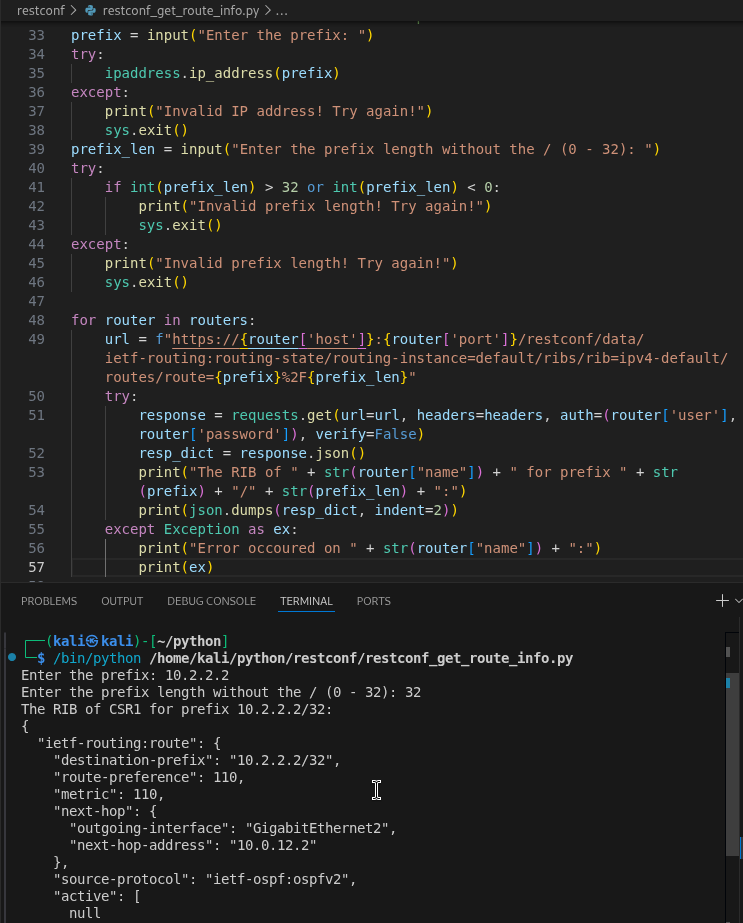
Notice the %2F in the URI: we can't just write the "/" (forward slash) in the URI, because it's used as a delimiter, so we encode it as %2F. After that we convert the response object into a Python dictionary by using the .json() method, and printing it in JSON using the .dumps() the same way as before. In the example above I search for the prefix 10.2.2.2/32, you can see the output of the CSR1 router: we can see that the router learned this prefix via OSPFv2, we can see the next-hop, the AD, the metric, and also the outgoing interface. If a router doesn't have the prefix, or is not reachable, the scripts moves to the except: block, and we print the reason why the commands in the try: block failed.
5.4.2 Getting CPU and memory utilization data of the routers
Lastly I show a Python script where we read the CPU and the memory utilization of the routers. For this script we use the Cisco-IOS-XE-memory-oper and the Cisco-IOS-XE-process-cpu-oper YANG models:
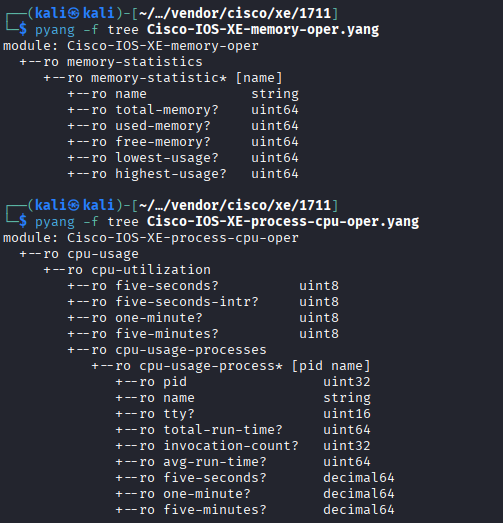
Cisco-IOS-XE-memory-oper and Cisco-IOS-XE-process-cpu-oper YANG modelsThese YANG models provide only operational (state) data as we can see from the "ro" marking. Also notice that these are vendor-specific YANG models, so that we can only use these with Cisco devices. And this is the Python scripts:
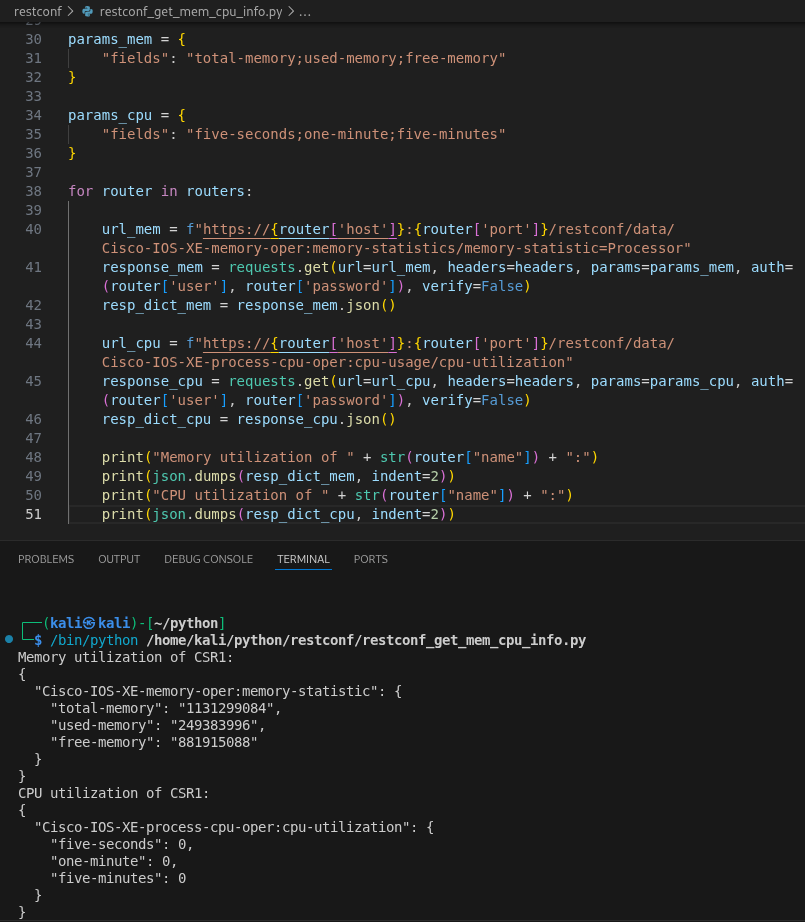
Notice that here I used the params attribute with both requests to retrieve only three specific leaf values from the memory-statistics and the cpu-utilization list. These are passed using the params attribute to the response object as Python dictionaries. For the key value we have to use the fields keyword, and the leafs are separated with ";" (semicolon) as the value of the fields key. For CPU utilization I got 0 back from each router, I don't know whether these are the real values, or these are 0s because of these are virtual images (CSR1000v) and the routers doesn't have a physical CPU.