Network Automation with Python: Netmiko and NAPALM basics
In the previous post we've seen how we can automate network devices by sending/receiving structured configuration/state data by using YANG models. Now we're going to take a look at different network automation techniques: we're going to be sending pure CLI commands to the networking devices via SSH. This has some advantages and disadvantages compared to RESTCONF or NETCONF of course: we don't have to know YANG models, JSON or XML encoding, and the device doesn't have to support the NETCONF / RESTCONF protocols, we only need SSH access to the devices. But we won't receive fancy JSON or XML encoded data from the device, which we can convert into Python dictionaries and we can easily parse through, but a device will send the same, unstructured text back which we would normally get if we issued the commands via a normal SSH session. There are some techniques of course to convert the unstructured data back to Python objects using the TextFSM library and templates. At the last section of the post I'll show a few example how we can do that. But let's start with Netmiko.

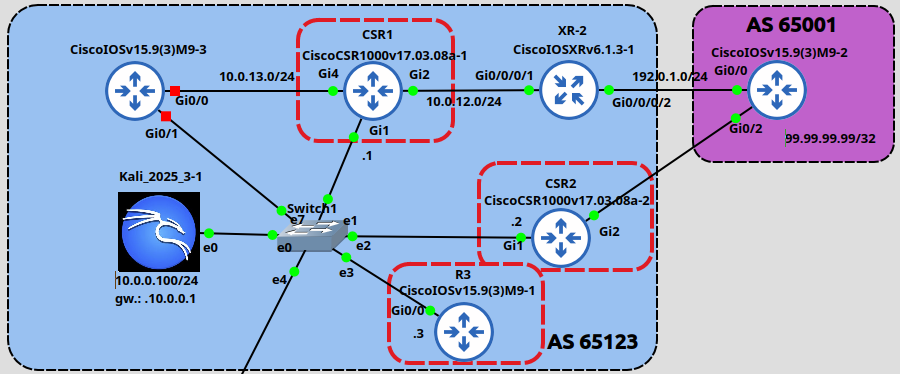
We're going to automate three devices this time: CSR1, CSR2 and R3. The CSRs are IOS-XE devices using the CSR1000v image, and R3 is a regular IOS device using the IOSv image. I'm using a dedicated Mgmt VRF for network management, each device has an interface in the 10.0.0.0/24 network, including the Kali machine with the IP address of 10.0.0.100 which we'll be using as the management station to run the Python scripts and to automate the devices.
I uploaded every Python script I show in this post to my GitHub ropo. Feel free to download, run them, make them better if you wish.
1 - Sending CLI commands from file
First we're going to run the the send_cmds_from_file.py script. This is how it looks like:
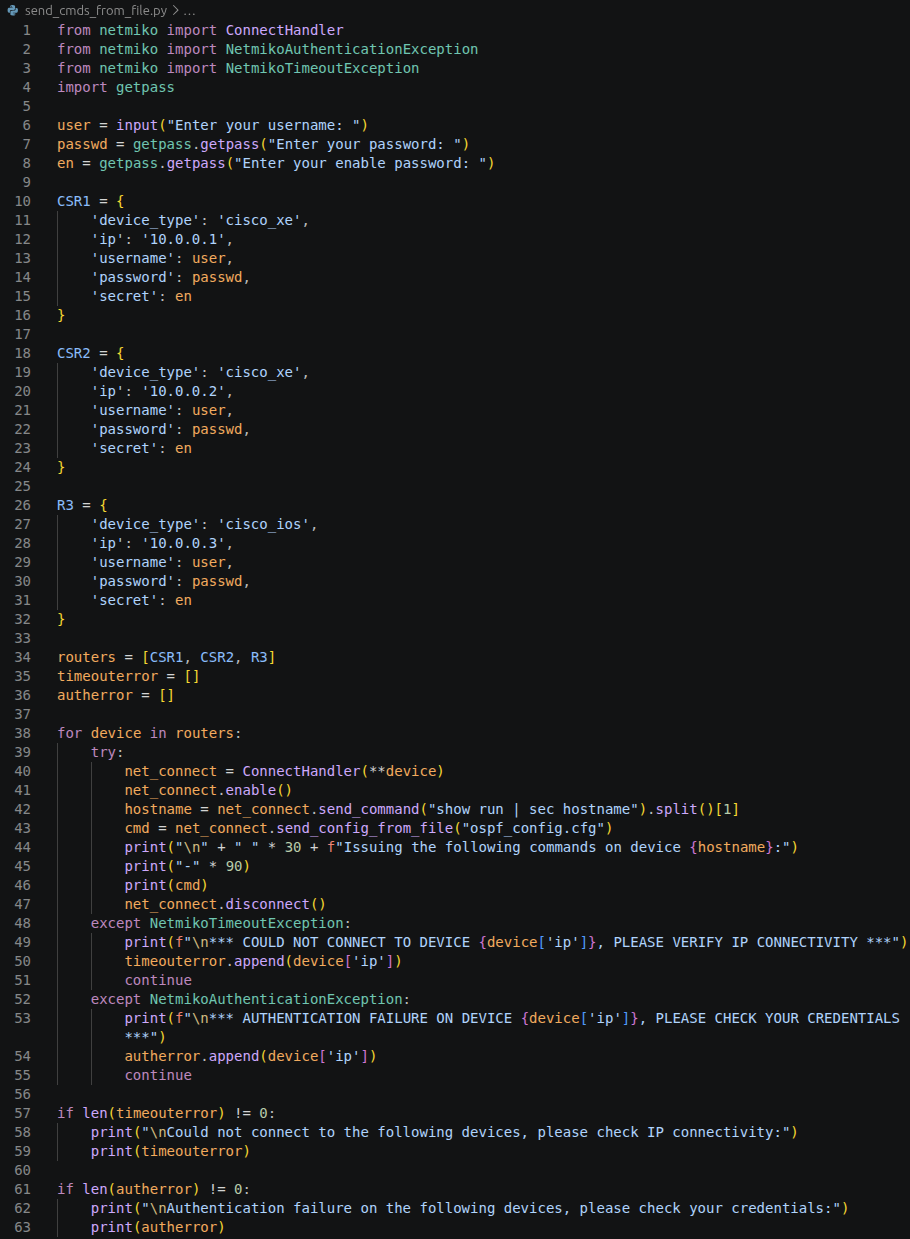
First we create a dictionary for each of our devices to specify its parameters: the IP address and the username/password for the SSH connection, the enable password, and also the device type: for regular IOS this will be cisco_ios, for IOS-XE cisco_xe, for IOS-XR cisco_xr etc. There are many others, we need to take a look at the documentation to choose the appropriate device_type for our device. Next we put these dictionaries into a list (I named it simply routers in this example), so that we can easily loop through each of them using the for loop. Next we create our net_connect object by establishing the SSH connection to the routers using the ConnectHandler class: here with the **device we simply pass the whole Python dictionary as the argument.
The net_connect will be our most important object in this example, we'll use this to call the other Netmiko methods. Like in the next row, with the net_connect.enable() we enter enable (exec) mode. Next we extract the hostname of the particular device from its running-config using the send_command() method. This one returns the hostname in the "hostname <actual hostname>" format from the running-config. With the split()[1] method we split these two words and put them into a list, and we retrieve the second element of the list, that will be our actual hostname. Next we actually send our actual commands to the routers with the send_config_from_file() method. For this we need to create a text file where we simply list our CLI commands that we'd like to actually issue on the devices. In our case I named this ospf_config.cfg: here in this example I enable OSPF on all of the interfaces in the Mgmt VRF and change the reference-bandwidth to 10 Gbps on all of the routers. Notice that we don't need to enter global config mode with the "configure terminal", all of the commands are issued from the global config mode. Here are the actual commands I listed in this ospf_config.cfg file and the output of the actual Python script when we run it:
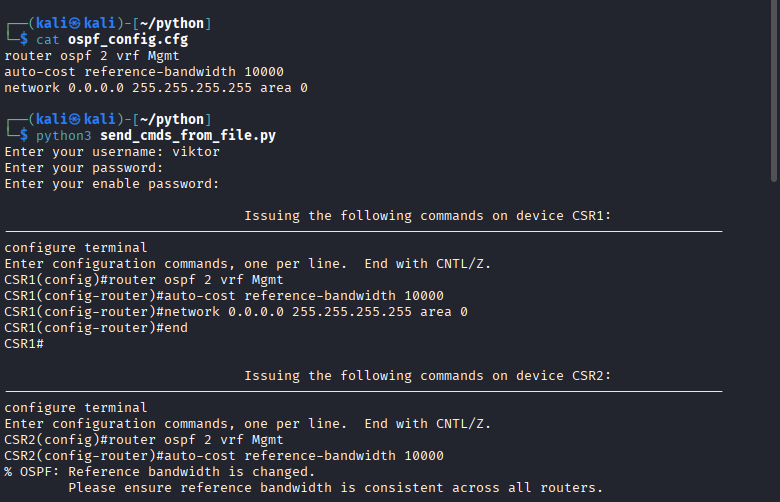
What about the two exceptions I created in the script? Well in this example I only have three routers, but imagine that in a production network we have hundreds of routers. We don't want our Python script to stop when we cannot reach a particular router for example. So if we cannot connect to a router via SSH or we cannot authenticate via SSH for some reason, the scripts skips the try: block and executes one of the except: blocks. I'll show in the next example how it works.
2 - Running a single command on the routers
Now let's actually verify with a show command that the three routers have established an OSPF adjacency with each other in the Mgmt VRF. For this we'll use the run_single_cmd.py script, where the script asks the user to enter a show command which we store in the command variable and pass it to the send_command() Netmiko method as a string. I shut down the Gig1 interface of CSR2 purposefully before running this command to demonstrate how the script executes the except: block when it cannot connect to a device via SSH:
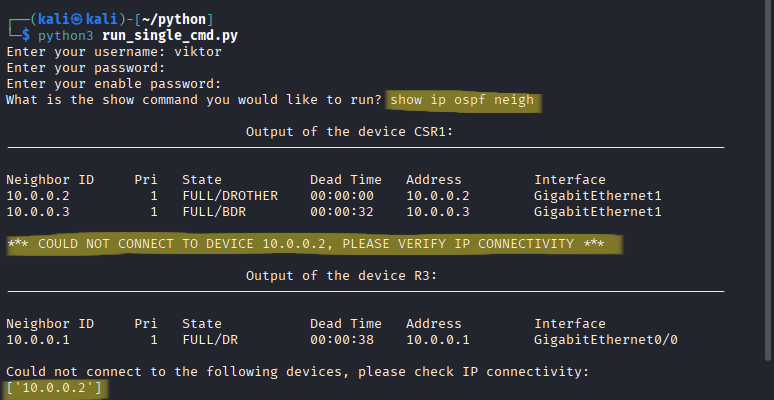
As you can see at the end, the script prints the list of the devices which it couldn't establish the SSH connection with, in this case CSR2 (10.0.0.2). Without the except: block the script would fail at CSR2, and wouldn't execute the commands for the next element of the for loop which is R3.
3 - Sending multiple commands to the devices
Next we're going to run the run_multiple_cmds.py script: this is very similar to the first one where we send commands form a file. The difference is that here we're using the send_config_set() method, and pass the commands argument to the method as a list. Again, the commands are going to be issued from the global configuration mode, so we don't need the "configure terminal" at the beginning of the list.
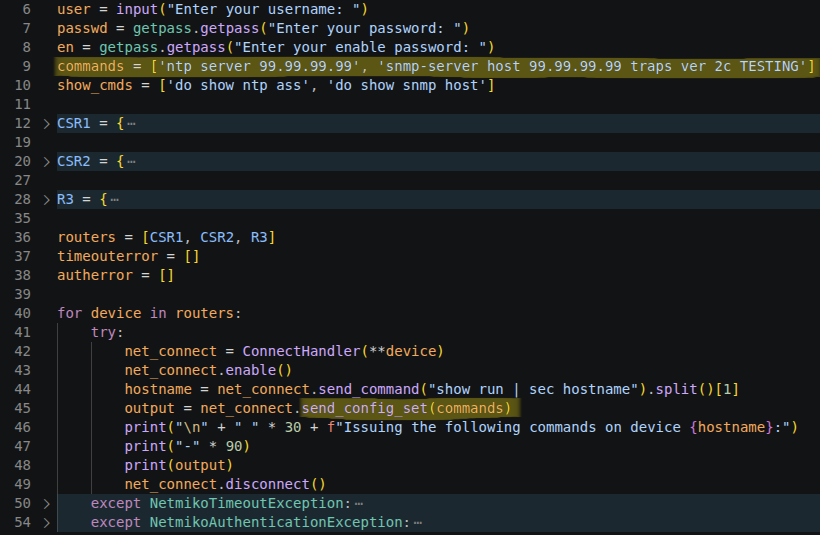
Here I send NTP and SNMP configuration commands to the routers. And this is the output of the script when we actually run it:
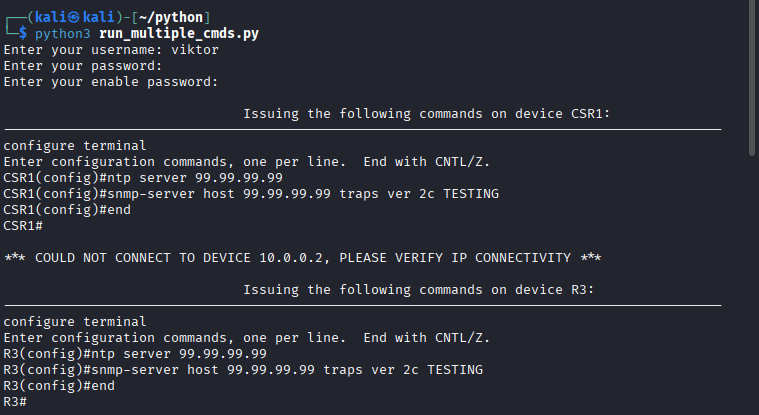
Notice that I forgot to enable the Mgmt interface of CSR2, so the commands won't get pushed to CSR2, but otherwise the commands on CSR1 and R3 have been executed successfully.
4 - Saving the running-config to a file
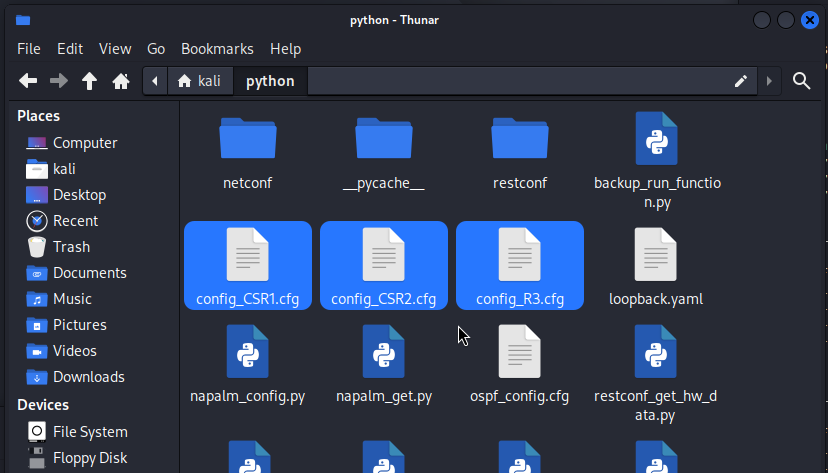
Next we're going to back up the running config of all of our devices to a file in the following format: "config_<hostname>.cfg". For this we're going to run the save_running_config_to_file.py script:
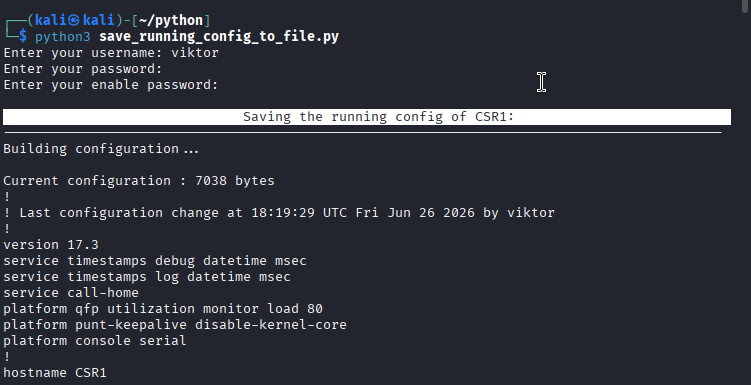
For this one I use the same send_command() method as well, except that this time besides printing the output to the terminal, we're also sending the output to a file. So after running the script, we have configuration file of every device in our directory:
5 - Using argparse
Before we move on to the NAPALM scripts, let's take a look at one more thing which can be very advantageous when we don't want to run our scripts manually, but run them as CRON jobs for example. So we can specify the inputs for the scripts (username, password, enable password and which commands we would like to run) as arguments on the CLI, so the script won't prompt us to provide the input. So I modified the previous run_multiple_cmds.py script and created the run_multiple_cmds_argparse.py:
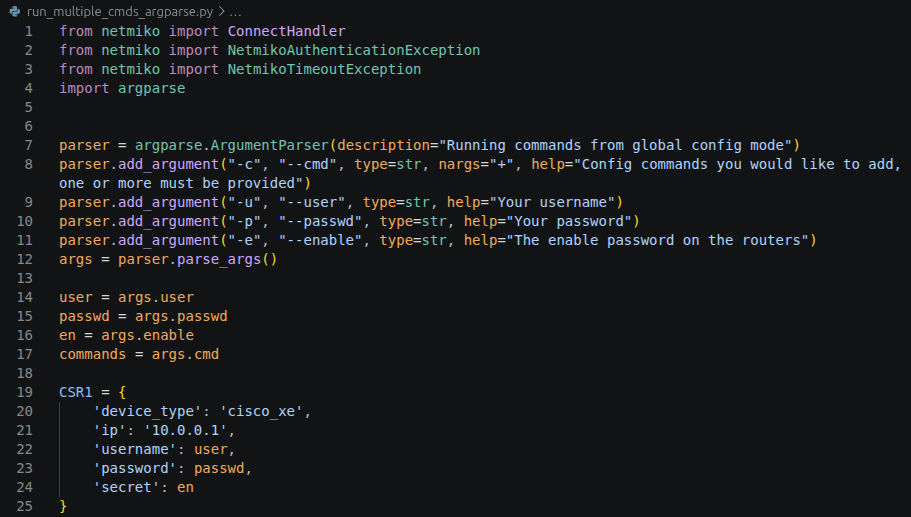
Here I created four arguments for the script which we must provide via the CLI in the Linux terminal like this:
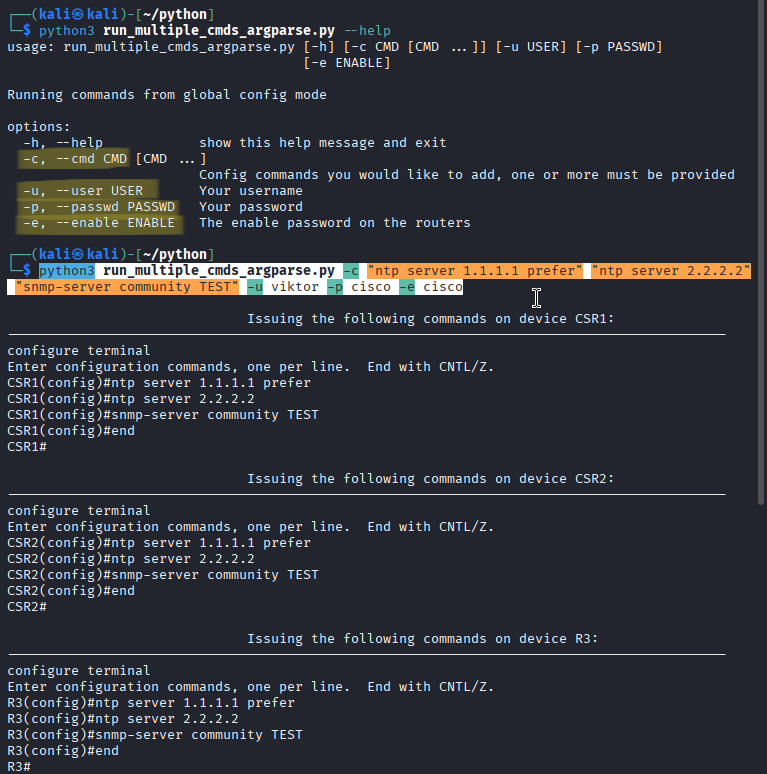
Notice that with the "-c" or "--cmd" argument we can pass multiple commands to the script, and the script won't prompt us for any input, every argument needed is passed to the script beforehand.
6 - Getting structured data from devices using NAPALM
NAPALM is another Python library used for network automation. It can be very handy when we want to retrieve data from the devices in a multi-vendor environment in a structured way.

The main advantage of NAPALM is that it returns the same structured output for every device regardless of the vendor. We can have a mixed-vendor environment (Cisco, Juniper and Arista devices are supported currently), the structure or the format of the output will be the same for every single device.
NAPALM has many "GET" methods, let's take a look at the napalm_get.py script I created. Here the user enters a number which get method he wants to run with the devices, I won't show all of them but let's take a look at the get_bgp_neighbors_detail() method for example, number 8:
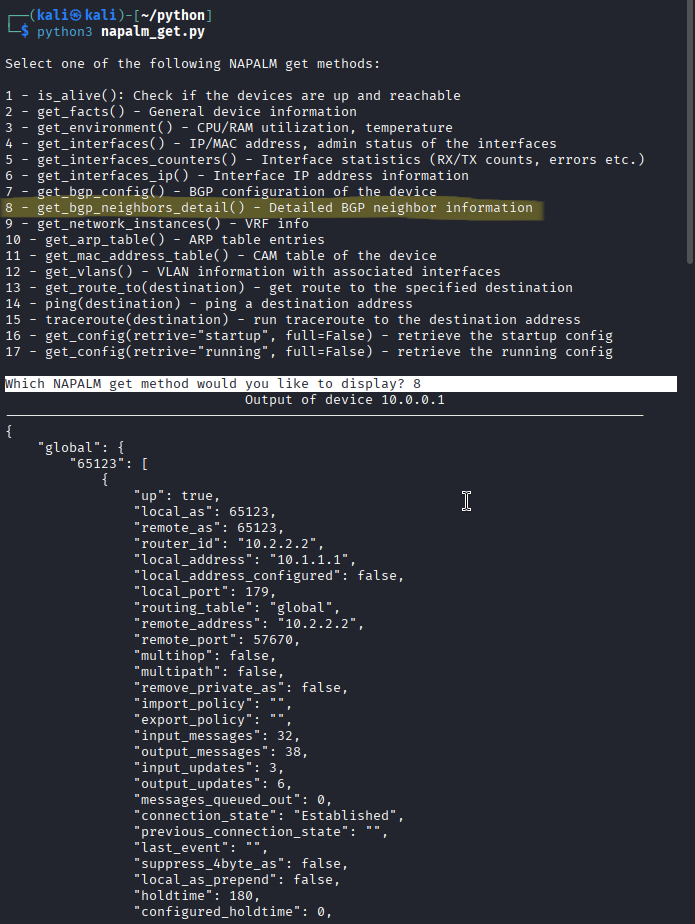
Notice that unlike with Netmiko where we could print the raw CLI output of the devices, here the NAPAM script returns structured data, a Python dictionary. This might be less-human readable, but it can be much more beneficial if we have to parse though the data or modify a specific field. Notice that CSR1 is an IOS-XE device, but the structure of the output will be the same for IOS-XR, NX-OS, or for Junos devices as well.
Let's take another example: the get_route_to() method searches a user-specified prefix in each router's RIB and returns whether that prefix is reachable and how the prefix was learned:
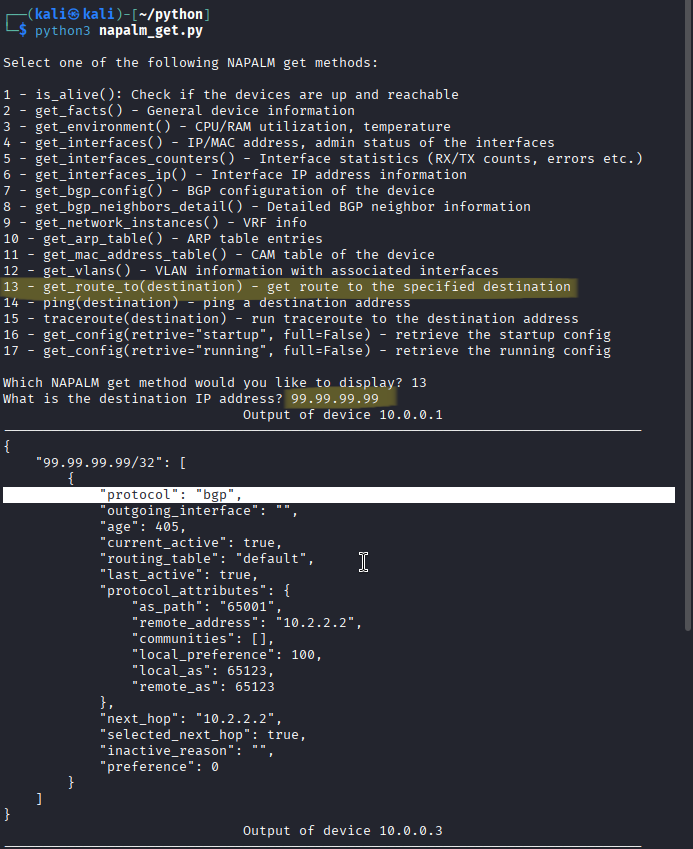
This can be used for troubleshooting, notice that it provides plenty of data in a unified, structured way.
7 - Parsing raw text using TextFSM
Now we've seen what is the difference between structured and unstructured data. texfsm is another Python library which allows to convert unstructured data (raw output of a show command) into structured Python objects. To do this we need to create a template file beforehand where we can define the structure how the script should parse our show command. Let's take a simple example: this is the traceroute.template template file I created to parse to output of the traceroute command. Notice that the template file uses regular expressions. This one is relatively easy, but we create much more complex regex to parse the output of complex show commands, like the "show ip bgp" which we'll take a look at shortly. Here, in my template I defined three fields to parse the output of the traceroute command: the number of the hop (SEQ), the IP address of the next-hop route (NHOP), and the AS number (AS) (if applicable). And this is my traceroute_textfsm.py script where we use the template as an input. Let's trace to 99.99.99.99 from CSR1 and take a look at the output:
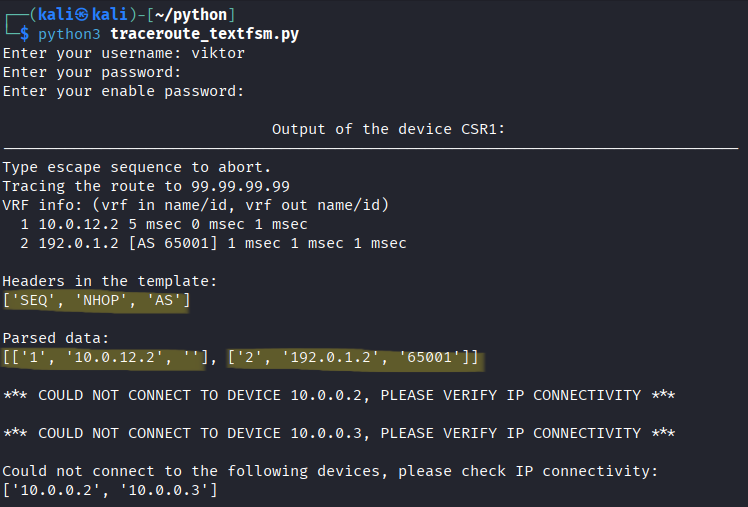
The result is a list of lists. Each element of a list is another list, and each element corresponds to structure of the template file we used to parse the text. This list is much more easier to work with if we just want to print the IP address or the AS numbers for example.
Thanks to networktocode there are many templates available on GitHub. We'll use the cisco_ios_show_ip_bgp.textfms template in the next example to parse the output of the "show ip bgp" command on CSR1. The following sh_ip_bgp_textfsm.py script sorts the prefixes into two categories based on the Origin code BGP path attribute. The prefixes have the "i" origin code if they have been advertised with the "network" command, and they have the "?" (incomplete) origin code if they have been redistributed into BGP:
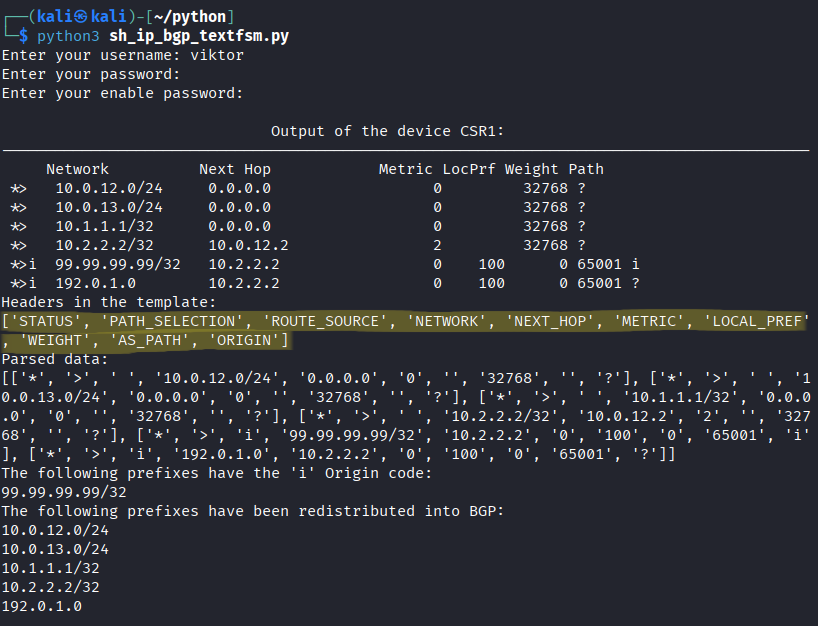
Notice the parsed data, it is again a list of lists, and each list represents a prefix and its path attributes. This one looks like mess, it's unreadable for the human eye, but it is very easy to work with. The ninth element of each list is the Origin code attribute, so we just need an "if" conditional within the "for" loop. This was a relatively simple example, we can do many other things based on the template, like sort the prefixes based on the originating AS, the local preference, the length of the AS Path attribute etc.